INTERVIEW WITH THE BREAKDOWN ARTIST
BY GINGER MARTINI
Breakdown and textile artistry are driving forces in any horror project. A skilled artist can transform the terrors written on the page into something visceral and unforgettable. By giving shape and depth to nightmares, using blood, gore, and the clever transformation of everyday objects, they draw the audience deeper into the world of fear. Breakdown artistry is a captivating aspect of the costuming craft, and some of CAFTCAD’s brightest talents in breakdown and textile arts have pulled back the curtain on their methods, offering audiences a rare glimpse at the magic that makes horror come alive on screen.
Click on the artist to read their interview:
Samantha Stroman
Sarah “Bloodstain” Blostein
Andrea Urra Moya
Anna Pantcheva
Tamara Rigby Funke
Alex Kavanagh
This article includes affiliate links. If you purchase an item through the links provided, CAFTCAD may earn a small commission.
SAMANTHA STROMAN
13 min read

Image courtesy of Samantha Stroman.
With over a decade of experience, Samantha Stroman has an impressive resume that reads like a dream list of projects in breakdown artistry. She’s won numerous CAFTCAD Awards in the Excellence in Crafts - Textiles category, including in 2025 for Shōgun, in 2022 Snake Eyes and 2020 for See. Samantha’s work was also nominated in the same category in 2022 for Peacemaker and 2019 for Altered Carbon.
Samantha’s most recent project, The Last of Us, had literally thousands of garments go through her breakdown department. Here Samantha divulges how she kept this massive undertaking on track, the process of creating breakdown on garments when action and aftermath are shot out of sequence, and how those stunning kosodes robes of Shōgun were hand-stenciled.
Connect with Samantha: @sam.breakdown
As a breakdown artist, you create the lived-in details of the costume pieces and bring scripted elements to life through your art. Can you tell us about the process of starting a project, and how you communicate with the costume designer about the look of a piece?
As a Breakdown Artist I'm of course actively thinking about the wear and tear a costume may show when I read a script. I pay attention to breakdown when I watch films, but also when I’m at the grocery store.
But starting a show means finding my pacing with the Designer. At the heart of it, my team and I are responsible for bringing the costumes to life, to fulfill the vision of our Costume Designer.
In the simplest of terms, the Designer provides me and my department with photo reference, illustrations or just a verbal description of what the costume should look like on camera (be it “gold encrusted,” or “like it’s been worn for three years,” or “they fell down a hill and here’s a sample of the dirt from set,” or “they got shot in the shoulder.”) Then my job is to figure out how to do that, not why they look like that. Even the amount of blood or dirt is generally the decision of the Designer and/or Director – it’s their vision that’s guiding the look of the show.
When you’re working with a new-to-you Designer, it can take a beat to figure out your dialogue. Different people work in different ways, and you need to build a strong working relationship; you need to build that trust. Once you can understand each other and trust each other, then it gets really fun. It becomes more collaborative, where you can anticipate characters and their looks, and you can come up with unique ways to solve the problems at hand. It’s all about problem solving, be it colour, technique or time. It’s how to get there.
In a dystopian series such as The Last of Us, the volume of pieces that need breakdown is massive. I’m guessing there isn’t a ton of time between fitting approvals to when those hero pieces and their multiples are needed for set. What was the size of your breakdown department? What were the timelines like and how did you organize the workflow?
The Last of Us season two was definitely the largest breakdown crew I’ve ever worked with! We had two Keys (myself and Ellie Schultz), plus about 15-17 artists in the shop and a dedicated on-set breakdown team that ranged from two to four artists depending on the day. At one point we even had a satellite workshop set up in both Calgary and Kamloops for episode two.
The turnaround times definitely varied, but you’re absolutely correct in assuming we were crunched for time! The volume of costumes was massive. For episode two alone, we broke down approximately 3,800 garments! That number still seems insane to me.
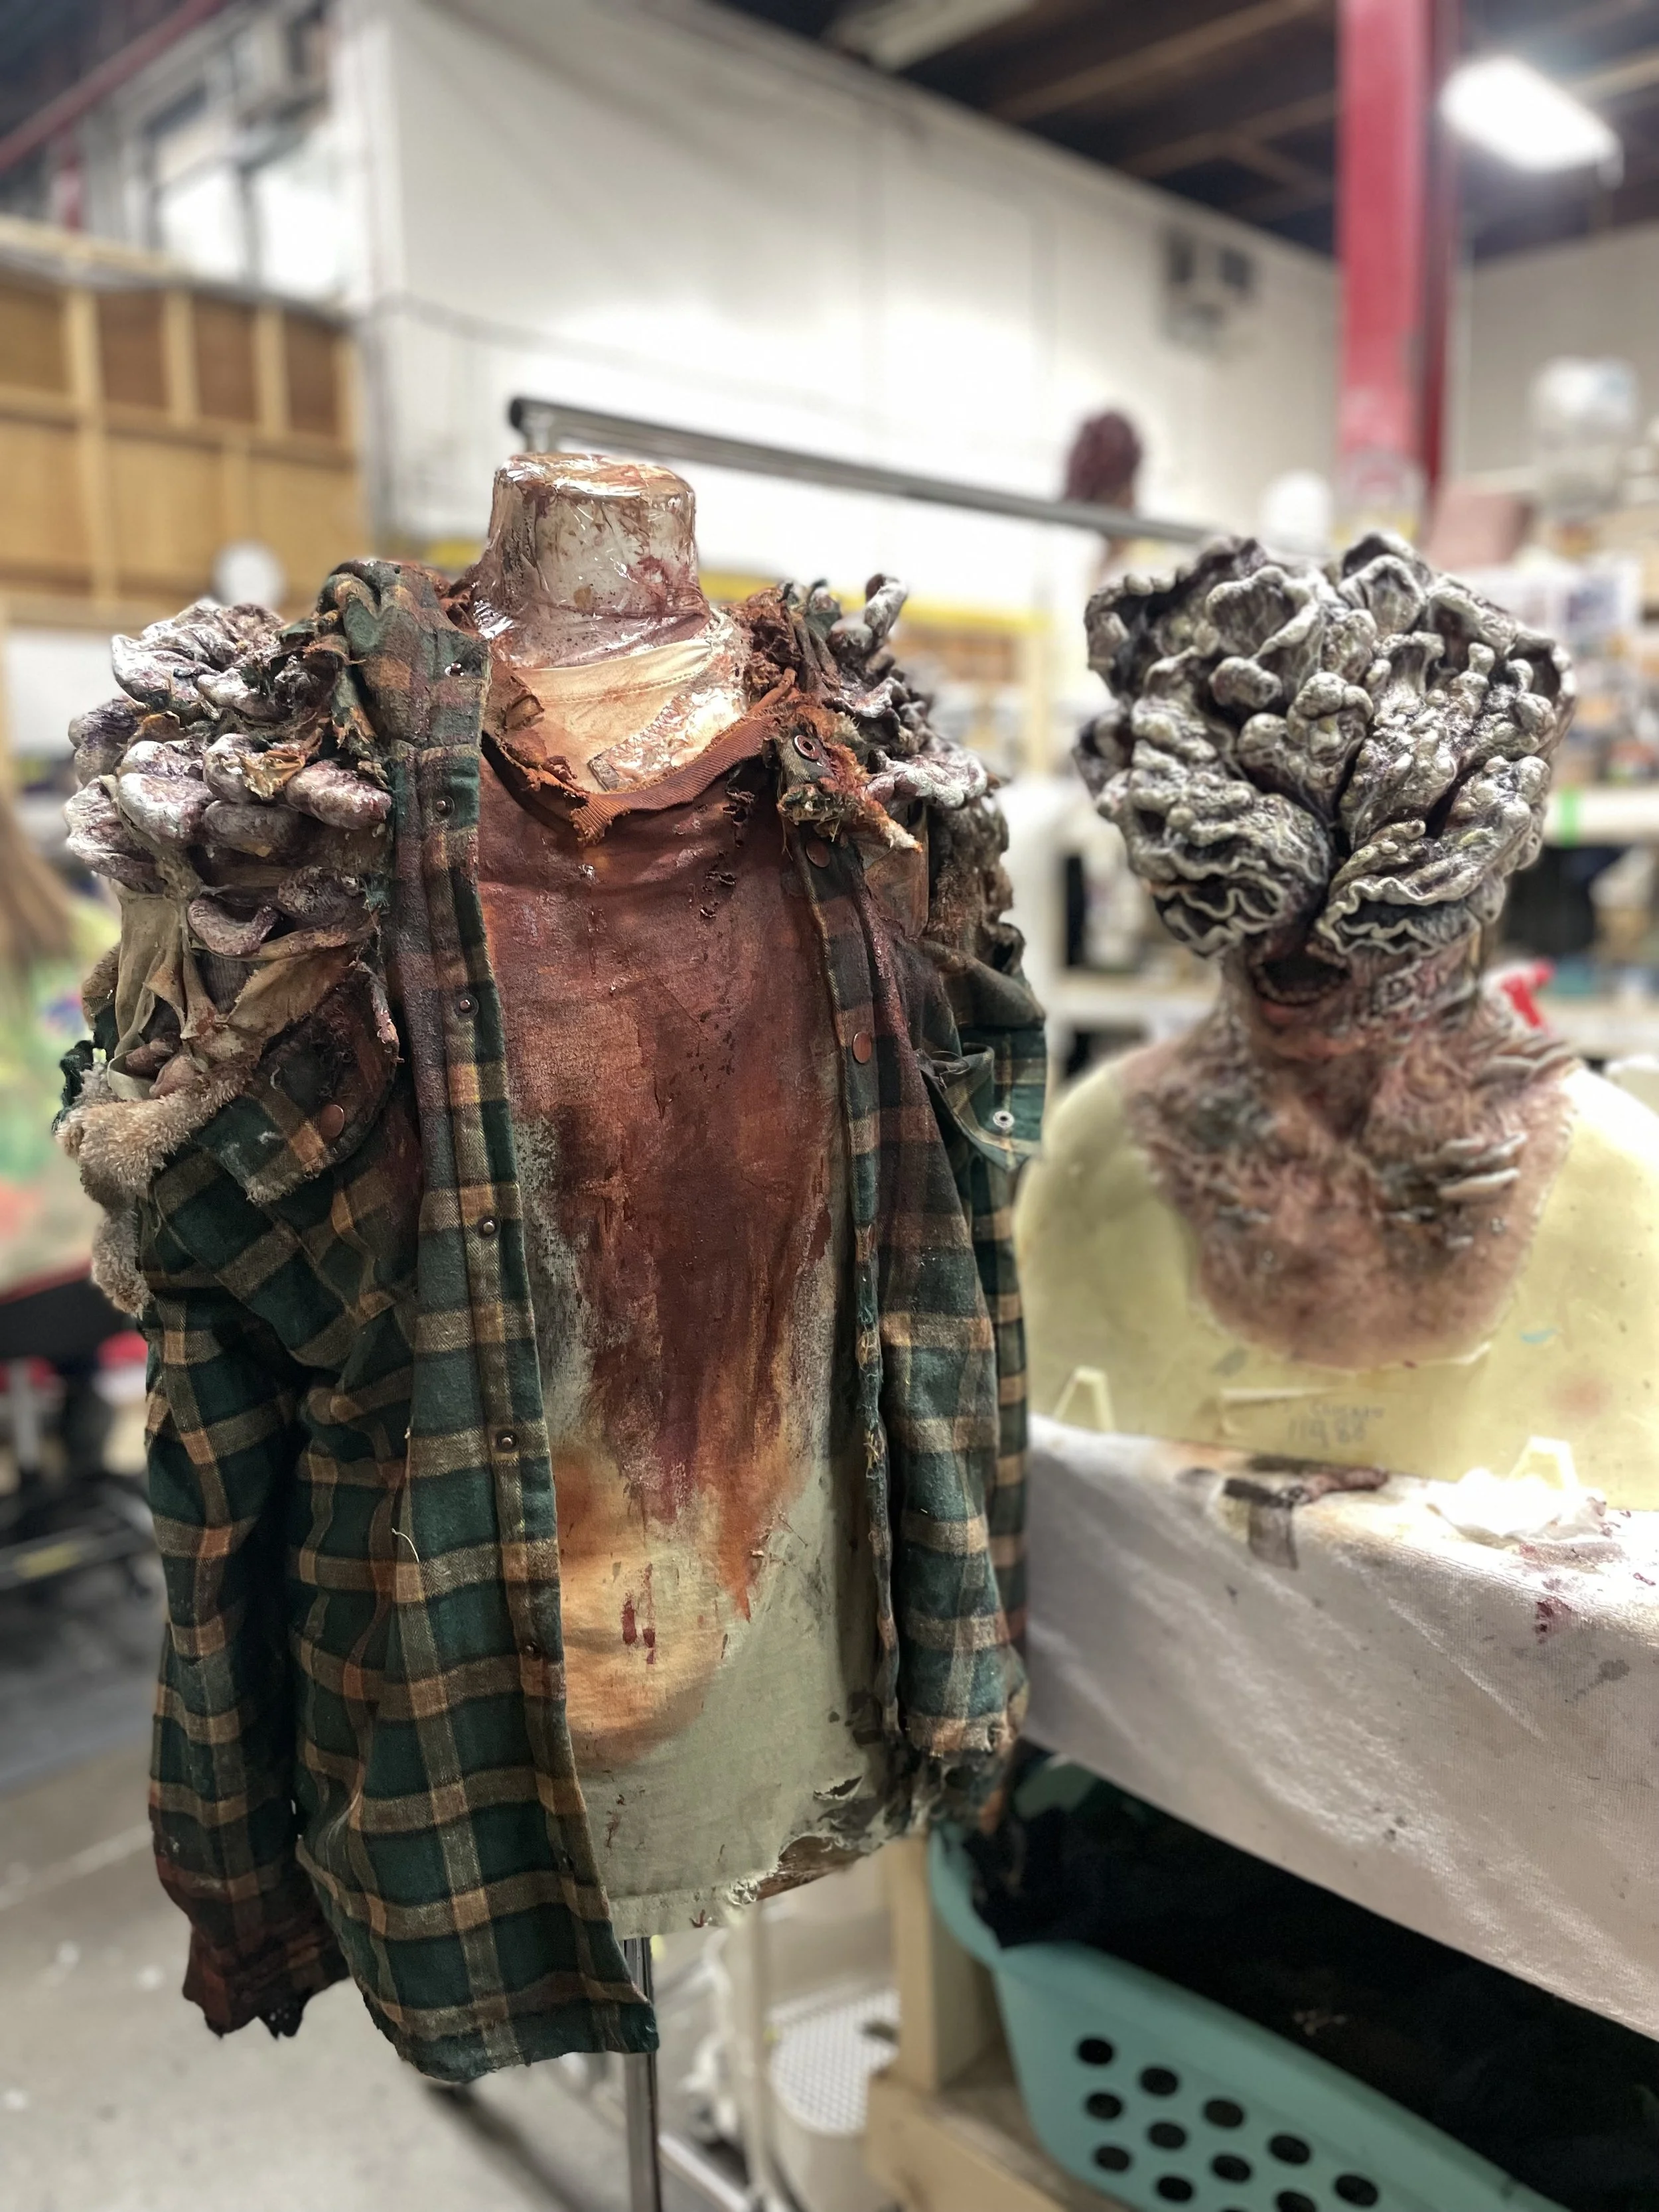
Clicker from The Last of Us, Season 2, Episode 2. Costume Design by Ann Foley. Image courtesy of Samantha Stroman.
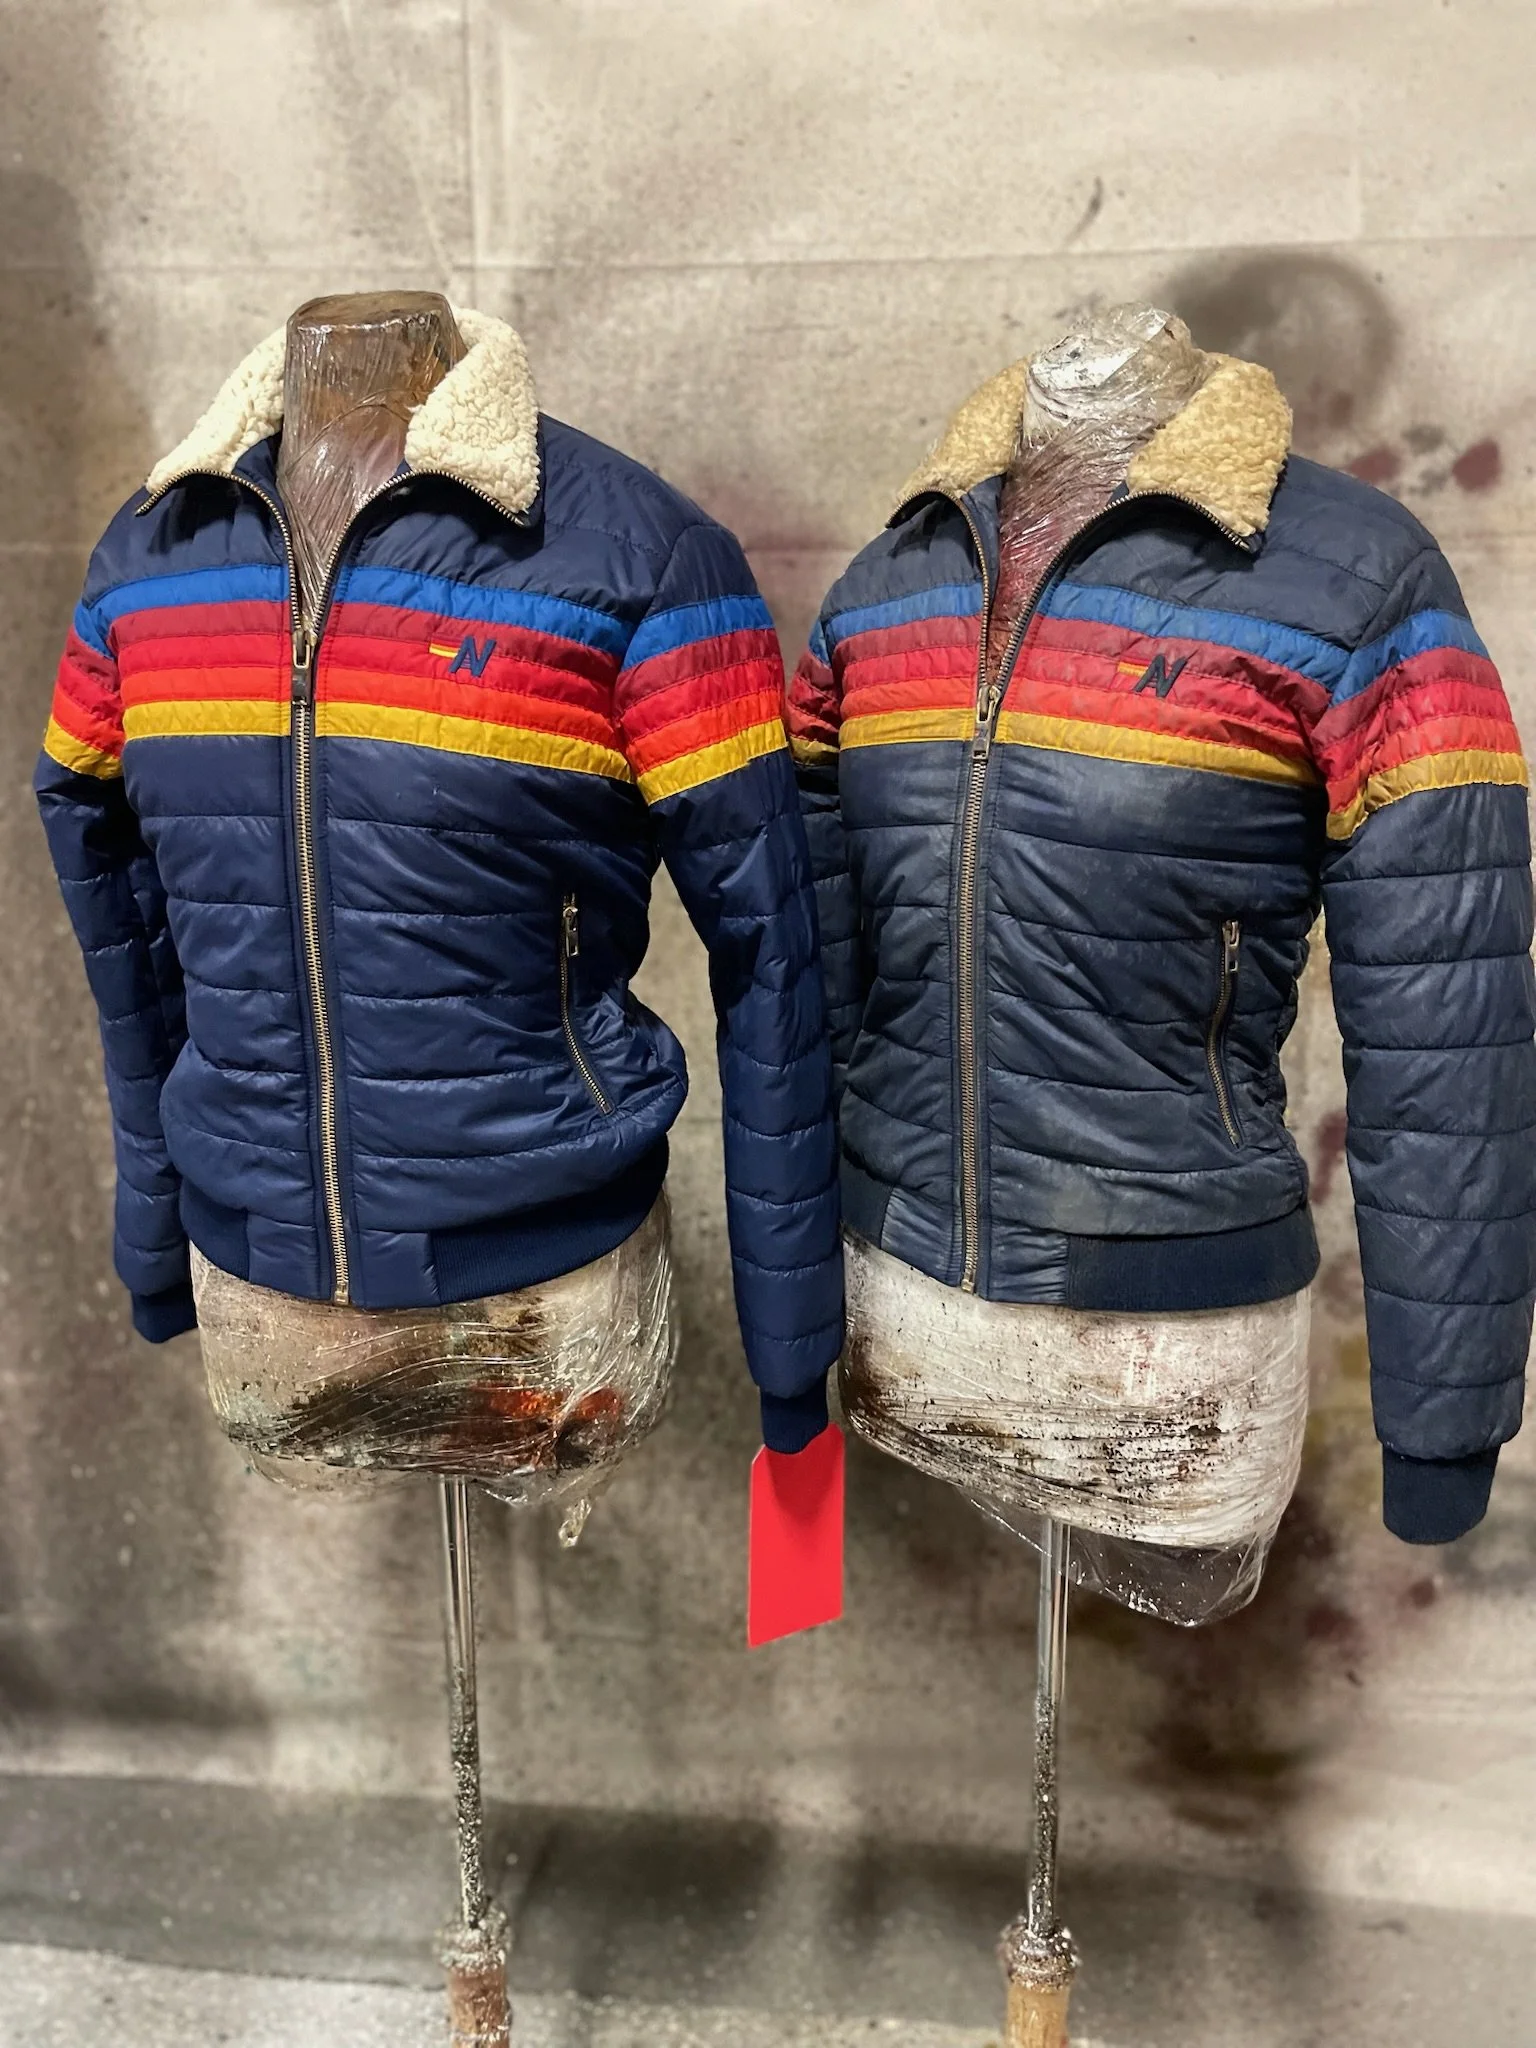
Dina's jacket from The Last of Us, Season 2, Episode 3. Costume Design by Ann Foley. Image courtesy of Samantha Stroman.
Sometimes we had days to turn stuff around, sometimes we had weeks. And sometimes, – surprise! – you need 10 more racks of BG done today. There were many points where we knew we wouldn't get approvals until a day or two before we went to camera, so we would just breakdown all the options before the fittings.
As for organizing the workflow, it took a lot of coordination with the various other heads within our department, and a million lists and calendars. Honestly, I felt like the majority of my days were spent in meetings on that show! We had different ACDs for cast and infected; our BG team would bring us all the BG and general stunts that were coming up, and we were also in constant contact with our set teams to make sure they had everything they needed. It wasn’t abnormal for us to have 10-15 racks of costumes in our workshop being worked on.
I like to start my days with a morning meeting to bring our team up to speed on the goals and deadlines for the days and weeks ahead, and then usually assign specific tasks to each person, be it dyeing, infected, BG, specified cast multiples, etc. Then I check in with everyone individually throughout the day to make sure a) they’re on track to meet their deadlines b) they’re confident in their application and technique and c) they are happy in their work. We may have had the odd breakdown challenge, such as “the first to breakdown three t-shirt options wins,” and there was always a lot of cheering when we cleared a rack from the room.

Dress for "the prophet" from Heretic. Costume Design by Betsy Heimann. Image courtesy of Samantha Stroman.
Speaking of multiples, how do you create consistent results when working with things like liquids and powders?
For consistency, I generally avoid both those things for multiples! Powders I usually relegate to on-set “in the moment” breakdown. If the look established with them needs to carry on to other scenes on other days, then we’ll usually bring it back to the shop and make it permanent with paint; same for liquid blood. If it’s just a one off, you can bag the bloodied garment and temporarily hot-stock it, but if it needs to carry on then we make it permanent.

Bloodied Peacemaker Super Suit from Peacemaker Season 1. Costume Design by Shay Cunliffe. Image courtesy of Samantha Stroman.

Close-up of bloodied Peacemaker Super Suit from Peacemaker Season 1. Costume Design by Shay Cunliffe. Image courtesy of Samantha Stroman.
As projects are so rarely shot in sequence, how do you map out the breakdown of an aftermath for an action sequence that hasn’t been filmed yet?
Through a lot of consultation with our Designer, and usually the Director and our Set and Truck Supervisors as well. Generally, we discuss what exactly the character has been through; I might describe or do a sample of what I think it should look like, and then we get feedback on whether that seems like too much or too little.
This was a major component of our work on Peacemaker season one. That show had so much blood and goo from various sources, and we almost always seemed to shoot them out of order. Our Truck Supervisor, Grace Delahanty, made up this incredible spreadsheet called the “Peacemaker Piece Tracker” that helped us track all the multiples, what stage they were at for each scene (meaning what bloodied/dirtied event they had been through), and even where each piece physically was while they were constantly going back and forth between set and the workshop for repairs and additional breakdown and cleaning.
You’re also a textile artist. How has working in both the textile and breakdown departments influenced your work methods?
I kind of use these terms interchangeably. Every show you learn something new, be it a new product or a new set of skills and methods. You definitely carry all that new information with you into the next project, and sometimes it’s something that didn’t really work out in the first place! There was a bunch of experimenting some of our team had done on Shōgun with a type of interfacing – melting it, painting it and messing with its form. The goal was to create a texture that could be removed from a rental piece of armour, but in the end it wasn’t the right answer for that project. Yet, on The Last of Us season two, we used the same product and a similar technique to create some of the texture required near the cordyceps on the infected. So yes, it’s all connected!
The kosodes of the women of stature in Shōgun have the most exquisite coloUrs and detailing. Can you tell us about the process of dyeing and printing the silks?
Our Costume Designer, Carlos Rosario, was very clear in his vision. Often our dye team would create samples based on his illustrations and boards for him to choose from. Likewise with printing; we would be given a clear but creative window to work within, we’d do up a bunch of samples on whatever amount of scrap fabric the sewing room could spare, and then consult with Carlos about it.
For many of the hero kosodes, there was only ever one built, no multiples. So to help visualize the end result, we would usually cut out paper prints of the motif, or cut little vinyl stickers of the shape, then place them on the garment for approval. This made it easy to adjust the location, scale or density before applying paint.
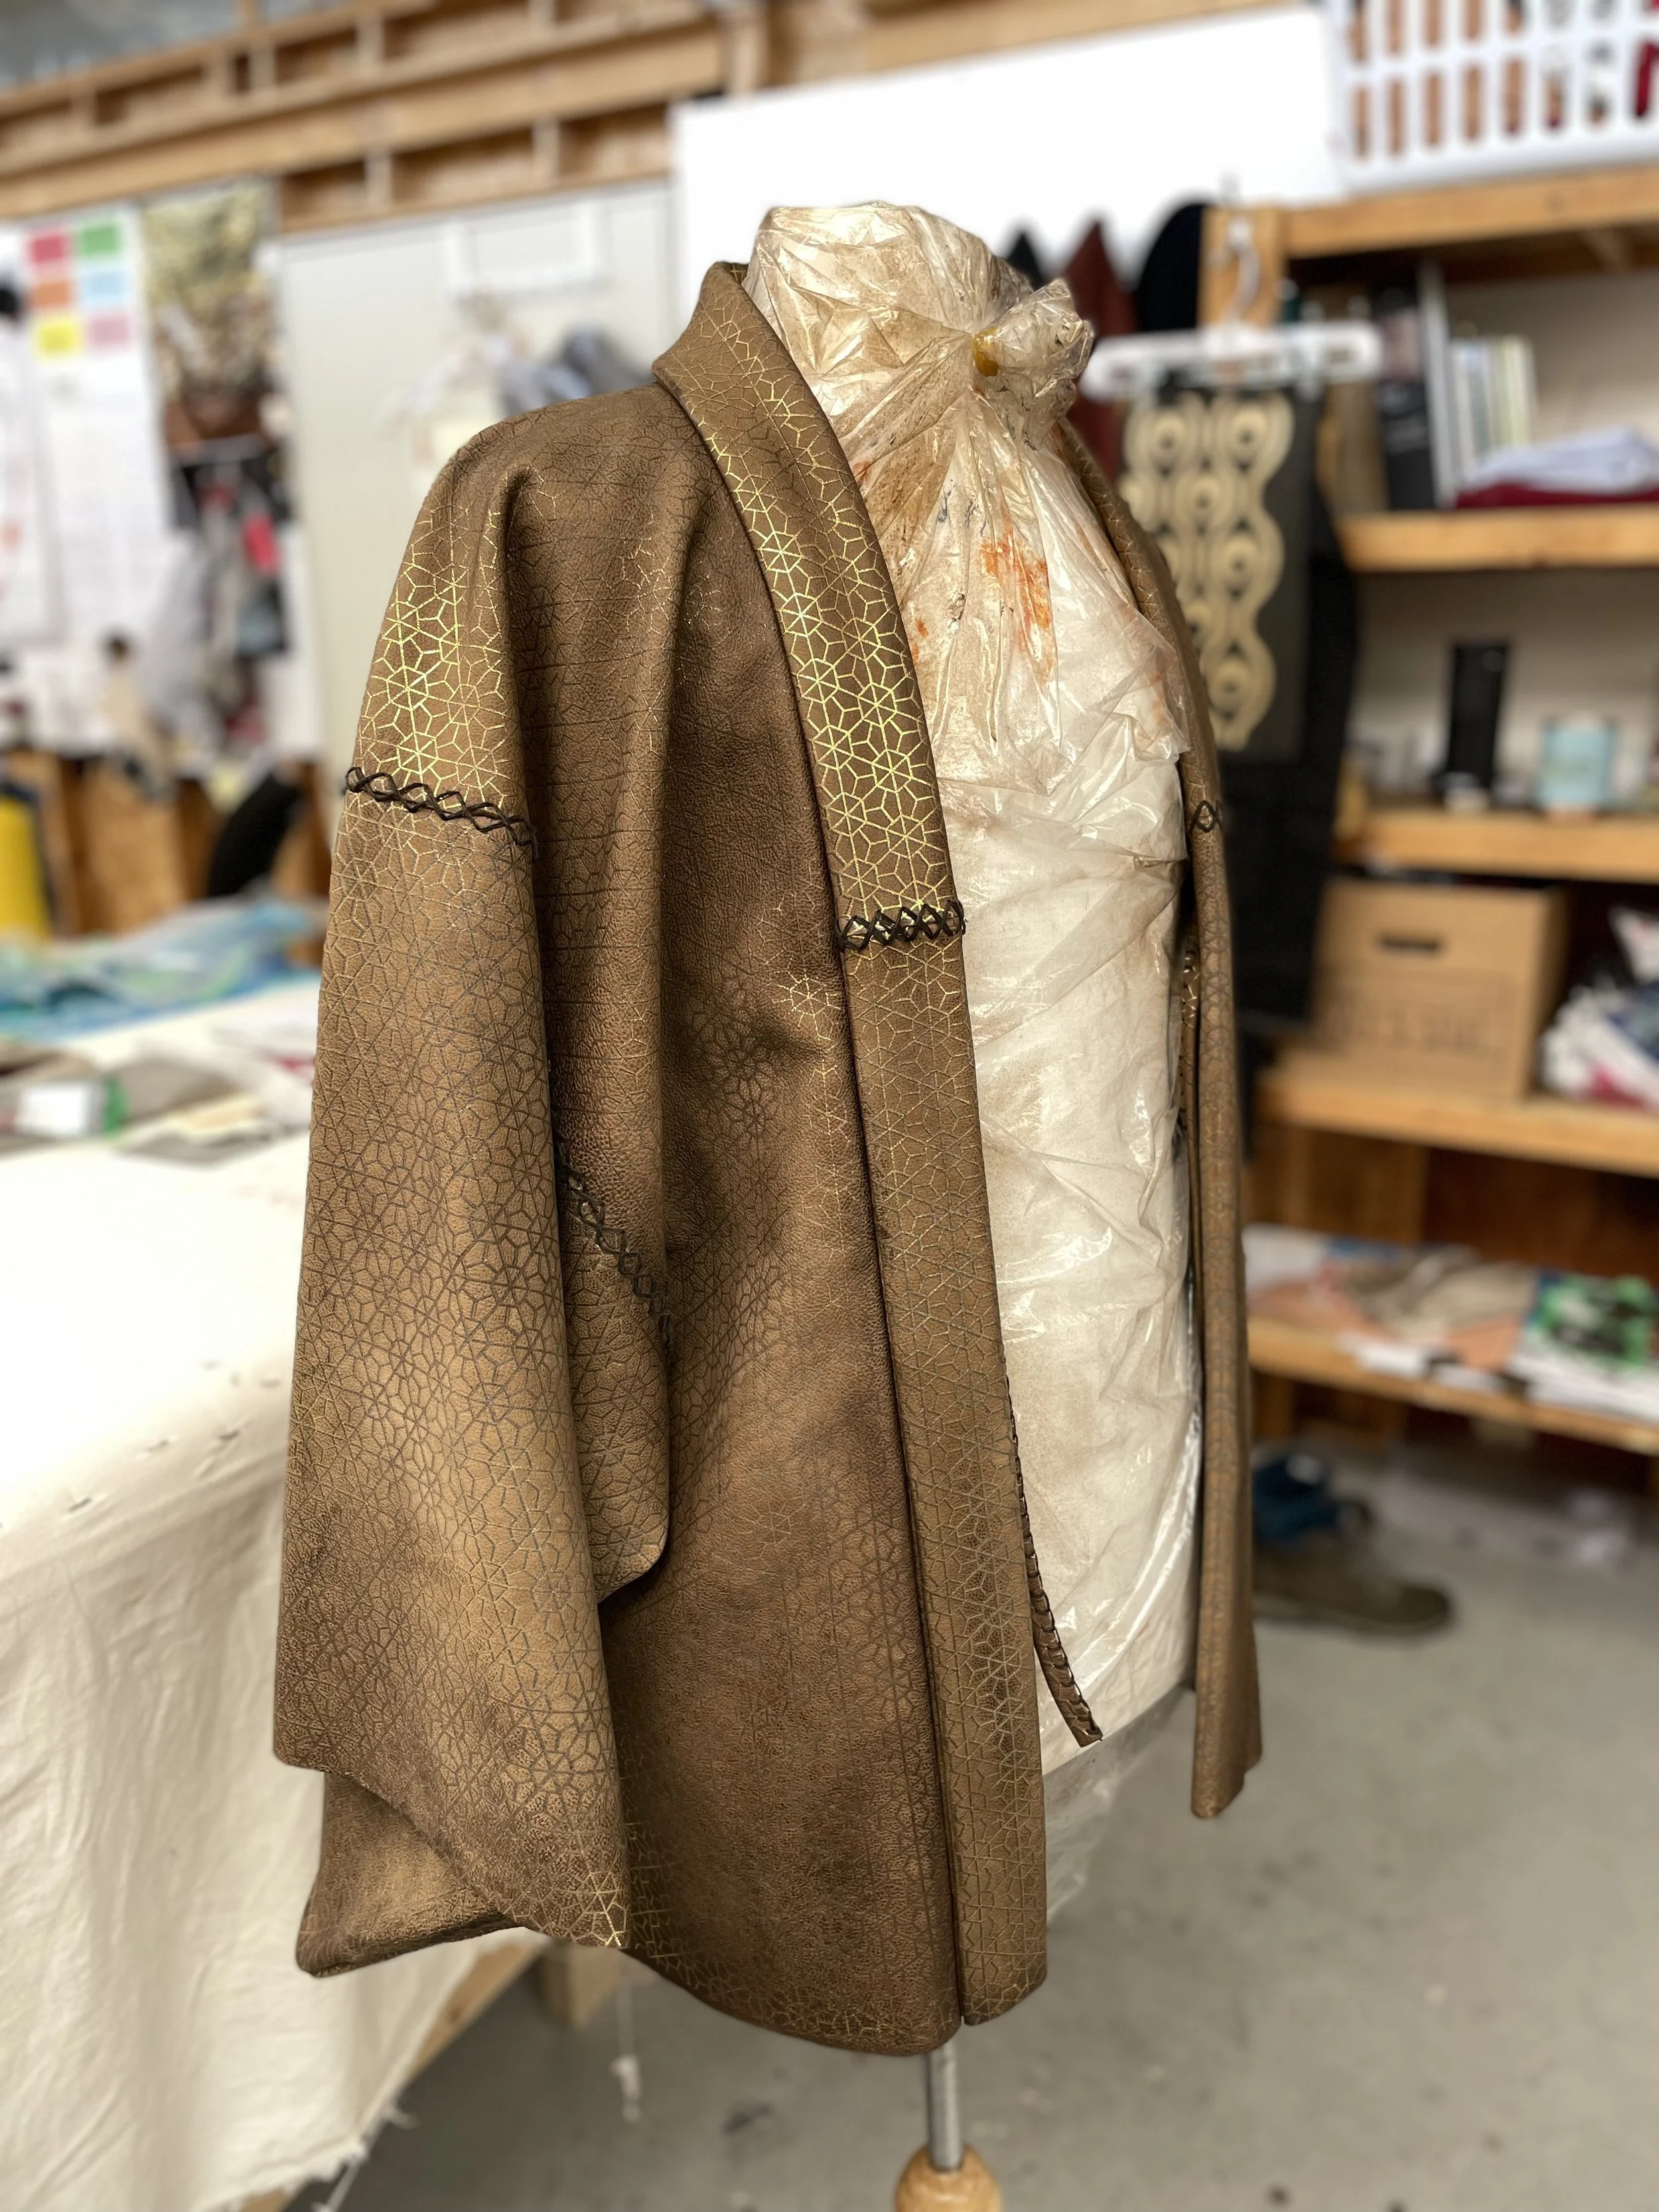
Toranaga’s dōfuku from Shōgun. Costume design by Carlos Rosario. Image courtesy of Samantha Stroman.

Lord Mizoguchi's jinbaori from Shōgun. Costume design by Carlos Rosario. Image courtesy of Samantha Stroman.
We did a lot of hand stencilling and screen printing. Using a Cricut machine we could cut all our stencils with sticker vinyl, and we had the ability to make small 11x14” screens in house for all our screen-printing needs.
The colours of everything were very specifically chosen. Even for the BG, we would do samples in various colourways to make sure everything read as intended. The male characters wear their family/lord’s crest on their chest and their centre back, and for every round of costumes we would sample various paint colours on each fabric. I think we sampled every gold paint we could get our hands on! A lot of people might think “gold paint is gold paint,” but when you’re working within that level of detail, a brighter gold might work for one character, whereas a softer more bronzy gold would work for another.
TIPS AND TRICKS
Best tips to keep blood and dirt looking fresh on clothing throughout shooting?
Use a quality stage blood. My go-to’s are usually Fleet Street or Red Drum. You can freshen up something that looks too dry with a little spray of water and/or glycerin. Hair gel and Ultra Wet are also good options, especially if you’re talking serious amounts of blood!
For dirt, pounce bags made with nylons are the go to for dusty looks. Use fuzzy mittens to help apply, and ultra-hold hair spray. It still will likely need touch ups throughout the day.
Best tips to keep the cast comfortable while wearing bloody clothing?
My on-set teams could probably get more into this, but it’s one of the reasons I often push for more permanent blood options when we can. Fake blood can usually transfer fairly easily, and yes, it feels gross. Some good underlayers/silks can definitely help. Gel bloods can sit more on top of the fabric, so you feel it less from the inside. Any time you can apply the blood ahead of time, dry it, and then just make it look wet on the day (water, glycerin, ultra-wet). It will be more comfortable for the performer – even if they need to be wet, at least they won't be sticky.
Best laundry tips to freshen up bloodied clothing without damaging the breakdown work?
This will greatly depend on your blood application and fabric content. In general, especially if you don’t have spares or time to test, avoid washing and spot clean when necessary. Air-dry only. Brush off whatever you can and spot clean using cold water and a microfibre cloth (sometimes a little ISO on a cloth). If you need to use detergent, make sure it’s something mild like Eucalan or Eco-Max (do not use Tide). Deodorize the garment with 70% vodka, 20% water and 10% ISO.
How do you keep your mental health on track when working on a particularly gruesome project?
Good question. It definitely can be a challenge sometimes!
Your team can make all the difference; if you can lean on the people around you when you need to, you’ll be the better for it. Trust your team and their abilities, and delegate when you can. Share the love, and don’t forget to celebrate the wins, even the little ones!
On The Last of Us, we would have an end-of-the-week meeting and toast to our successes: we’d literally list them off. It makes you realize how much you accomplished, even when there’s so much looming in the near future. Communicate, communicate, communicate, and ask for help when you need it. And it doesn’t hurt to have a trip lined up in the future to look forward to (treat yourself!)

sarah “bloodstain” blostein
11 min read
Sarah “Bloodstain” Blostein’s love of Halloween inspired her journey into the world of film and creative arts. With a background in visual arts and sculpting, Blostein’s expertise in breakdown artistry, SFX costuming, Prosthethic Hair and creature effects fabrication has been recognized through her CAFTCAD Awards nominations and wins, including the 2023 win for Excellence in Crafts – SPFX Building for Station Eleven. Blostein was also nominated for Excellence in Crafts Award – Textiles for Station Eleven and received a 2021 nomination in the same category for The Boys. Sarah shared some of her behind-the-seams stories and her love of all things breakdown.
Connect with Sarah: @breakdownbadass
Your expertise spans multiple departments, from breakdown artistry to creature fabrications, FX costumes to prosthetic hair. How has working in these different departments influenced your work methods?
I feel lucky to have dabbled in many different departments, as there are indeed many useful techniques I carry from one department to the next. On Ready or Not I was hired by the prosthetics department to break down a costume worn by a skeletal dummy body they were making. Once I had finished the physical breakdown and paint, the guy working on the mummified head and hands mentioned he was going to use toilet paper and latex to build the leathery skin. Seeing how great that looked, I added some liquid latex to the costume and looked great! It seeped into the fabric and gave it a gross greasy look like what you would imagine if the fibres were impregnated with body fat and grease. I tinted a few batches of the latex with acrylic paint in different tones and layered them. The way it seeped in and dried allowed me to stick the fabric to the body form underneath and really sold the look of a guy who fell into a well and had been rotting there ever since. I have used tinted liquid latex many times since to mimic everything from glue to vomit to semi-dried blood and guts.
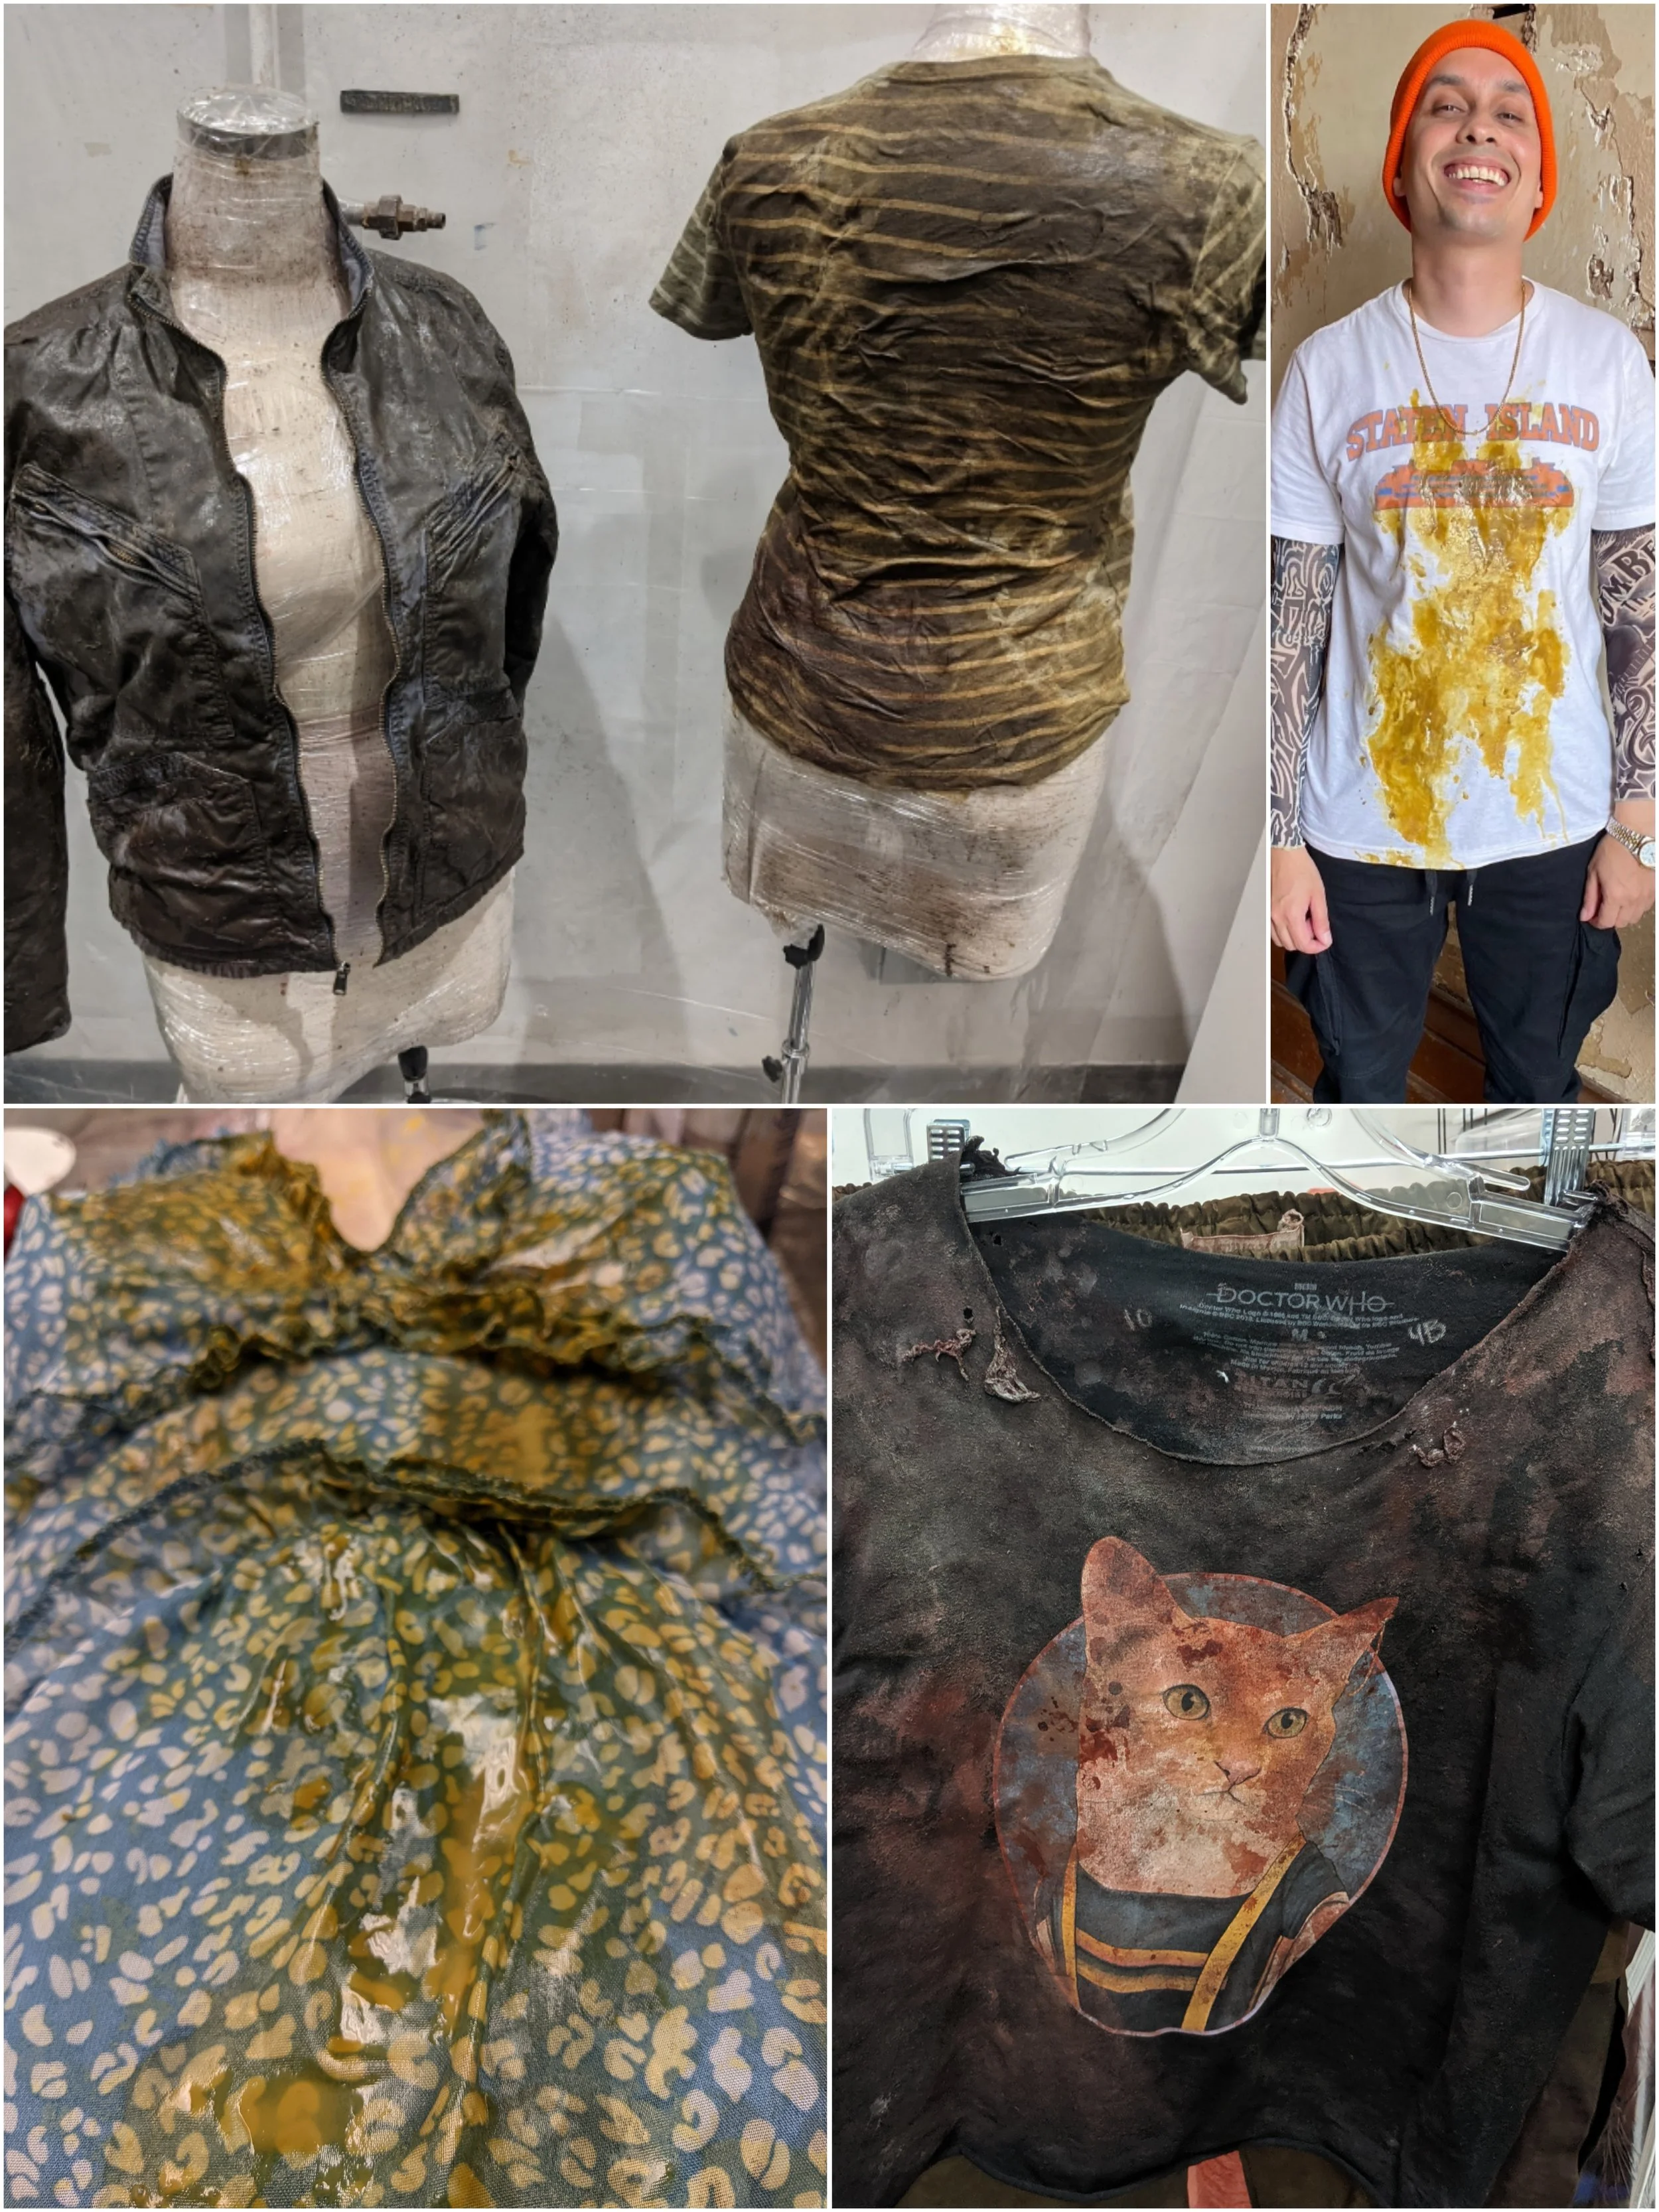
More uses for liquid latex. Images going clockwise: Y: The Last Man’s dead body, costume designed by Olga Mill; Trick VR Treat, costume designed by John Dunnett for the character Pete Davidson (Glue Vomit); The Boys, costume designed by Rebecca Gregg for the character Frenchy (Whale Guts Aftermath); and Trick VR Treat for the character Emily in Paris (Glue Vomit). Image courtesy of Sarah “Bloodstain” Blostein.

Liquid latex on the character Dead Body from Ready or Not. Prosthetics Head: Steve Newburn. Costume designed by Avery Plewes. Image courtesy of Sarah “Bloodstain” Blostein.
Silicone is another great way to get a wet look, and I have learned a lot about different kinds from working with Prosthetic Makeup Artists. As great a product as it is, silicone can be very expensive so it’s nice to be able to pick the brains of a few professionals when you are not sure what product to use. For example, most Breakdown Artists use a Smooth-On product called Dragon Skin for a wet look on fabric; it’s a stretchy silicone that can be thinned and tinted, but there are other companies that make similar, and in my opinion, better products that set faster and have more options for colouration.
There is another silicone product called Silisglass which sets water-clear and is great for ice chunks or (you guessed it) shards of glass! On Gen V we used this for a character who needed to look like he had a frosty super power. I used this product with another type of silicone to make realistic vomit mats for a scene where he parties too hard and passes out, covered in ice puke.

Ice Supe costumes from Gen V. Costume designed by Laura Montgomery. Image courtesy of Sarah “Bloodstain” Blostein.
Pax paint is another useful trick I keep up my sleeve. Because I was sensitized to chemicals early in my breakdown journey, I am unable to use many of the products most Breakdown Artists consider staples. Proper paint booths are also rare in breakdown so you’ll often see me in a respirator for most of the day. This is why I love pax (a mixture of Prosaide and acrylic paint used for prosthetic appliances) because I am able to paint plastics and other surfaces without resorting to spray paints like Impiriflex. In addition to not needing a respirator to use it, it doesn't peel or scratch off because it’s basically a layer of stretchy glue.
It’s also satisfying when I can use something I learned in costumes/breakdown in an SPFX makeup situation. Because of my own experience, I’m especially happy to be able to turn people on to more lung-friendly products. My original dream was to make monsters for movies but my exposure to a particular glue almost ended my career before it started. Barge adhesive is this super-toxic stuff that just happens to be industry standard; it’s used for shoe making, leather work, and by builders and fabricators. It’s really nasty stuff and can cause permanent nervous system damage. Aquilim is a water-based version that I found out of necessity because I can’t go near Barge anymore. It’s not quite as strong but I think it does a damn good job.
The scary thing with chemical allergies is it only takes one exposure to sensitize you and from there, everything you come in contact with can make it worse. It is now so bad I can no longer use anything scented like soaps, house cleaners, deodorant etc. I know many Breakdown Artists who will disagree with this, but I feel it’s important to use products that are safer for you to be around from the get-go before you make yourself sick – because once it happens, there’s no going back.
You’ve worked on a couple of virtual reality (VR) projects for Eli Roth. Did the VR aspect change any of your methods for breakdown of the costumes or what the end results of the in-scene action would look like vs a non VR perspective?
I don’t know that the VR format really changed much for costumes other than having to be aware of the 360 format. I think it was just harder in general as there were no “safe” out of frame angles so we all had to be hidden or really far from set. We would have to hide inside houses or around corners and literally come running in to do finals. Most of the department heads were given an Oculus headset to check out what the shots would look like during filming but I was only able to see the monitor, which looked like a weird snow globe.
Eli Roth's Haunted House: Trick VR Treat didn’t actually have a ton of on-camera breakdown action but Be Mine: A Valentine’s Day Slasher did. I was really excited about this one and had a great rapport with the Designer, who was thrilled to have me on as the blood expert. Unfortunately for both of us, the blood that production had purchased en masse was massively watered down and did not match what costumes and prosthetics had envisioned. Despite the Costume Designer pushing for it, we were not allowed to re-dress the costumes with a realistic blood colour after SPFX blood gags and the costumes ended up covered in what looked like pink lemonade. We had all hoped that this would be the one time that “fix in post” would come to our rescue so the blood would all match when the movie came out but, alas it did not. It’s a real shame too because there were some really fun kills in this one.
Where do you source reference images for specific wounds? For example, how do you know what a realistic stab or gunshot wound aftermath would be?
The good ol’ internet! But believe it or not, it’s actually much harder to find photos of people with bloody clothing than you might think. It’s especially challenging if you are looking for a blood reference for gunshots, stabbings, etc.
While images of people with wounds are plentiful, it is rare to find images of wounded people who are dressed, as clothing usually gets removed by paramedics and discarded when these injuries take place. And the more specific you get, the harder it is!

Bloodied multiples for Scavenger in The Last of Us, Season 1. Costume designed by Cynthia Summers. Image courtesy of Sarah “Bloodstain” Blostein.

Collage of background dead bodies from Chucky, Season 1, Episode 10. Costume designed by Catherine Ashton. Image courtesy of Sarah “Bloodstain” Blostein.
Because of this, there is a certain amount of anatomical research you have to do. Knowing which wounds bleed the most or the fastest, which ones spurt and which ones ooze. An arterial injury would mean bright red spurting blood and a quick death. A venous injury means darker blood and a steady stream, since veins are less pressurized than arteries so the blood would bloom and pool vs pulsing and shooting everywhere. This is where the artistry comes in. Once you know enough about how certain wounds act in the body, you can approximate the outcome.
Other factors can affect wound behaviour too, like temperature and elevation as well as the shape and depth of a wound. Sometimes though, you have to experiment until you find something believable. It can be a little bit like CSI, where they try to match up blood spatter patterns by hitting a dummy head with different objects until they find one that fits! There is also the element of personal preference. Sometimes you will get a Designer or (usually) a Director who has a certain look in mind and it doesn’t matter what you know, they want a bullet hole the size of a grapefruit and you just have to do it. That’s always the hardest thing for me to do, because I pride myself on realism.
Blood, grime and other gore almost always need multiples. How do you create consistent multiples of spatter and other stains for cast and stunts?
Honestly, I am a bit of a rebel when it comes to multiples. I know many Breakdown Artists like to create stencils and use measuring tapes or rulers to make sure their placement is perfect, but I like to free hand my multiples. I find it gives a more natural look, especially when dealing with blood and splatters.
Sweat stains I still freehand, but I will paint in a salt or water line with a fine brush. If I am able to trick my own perfectionist eye with a similar enough general shape and feeling, I believe the audience will feel the same. I have tried to hand-paint blood splatters before to copy a costume but I find it always looks too static and the borders too crisp.
I absolutely love free-handing things, and I love making multiples. It’s a really rewarding challenge and I probably enjoy it more than I should!
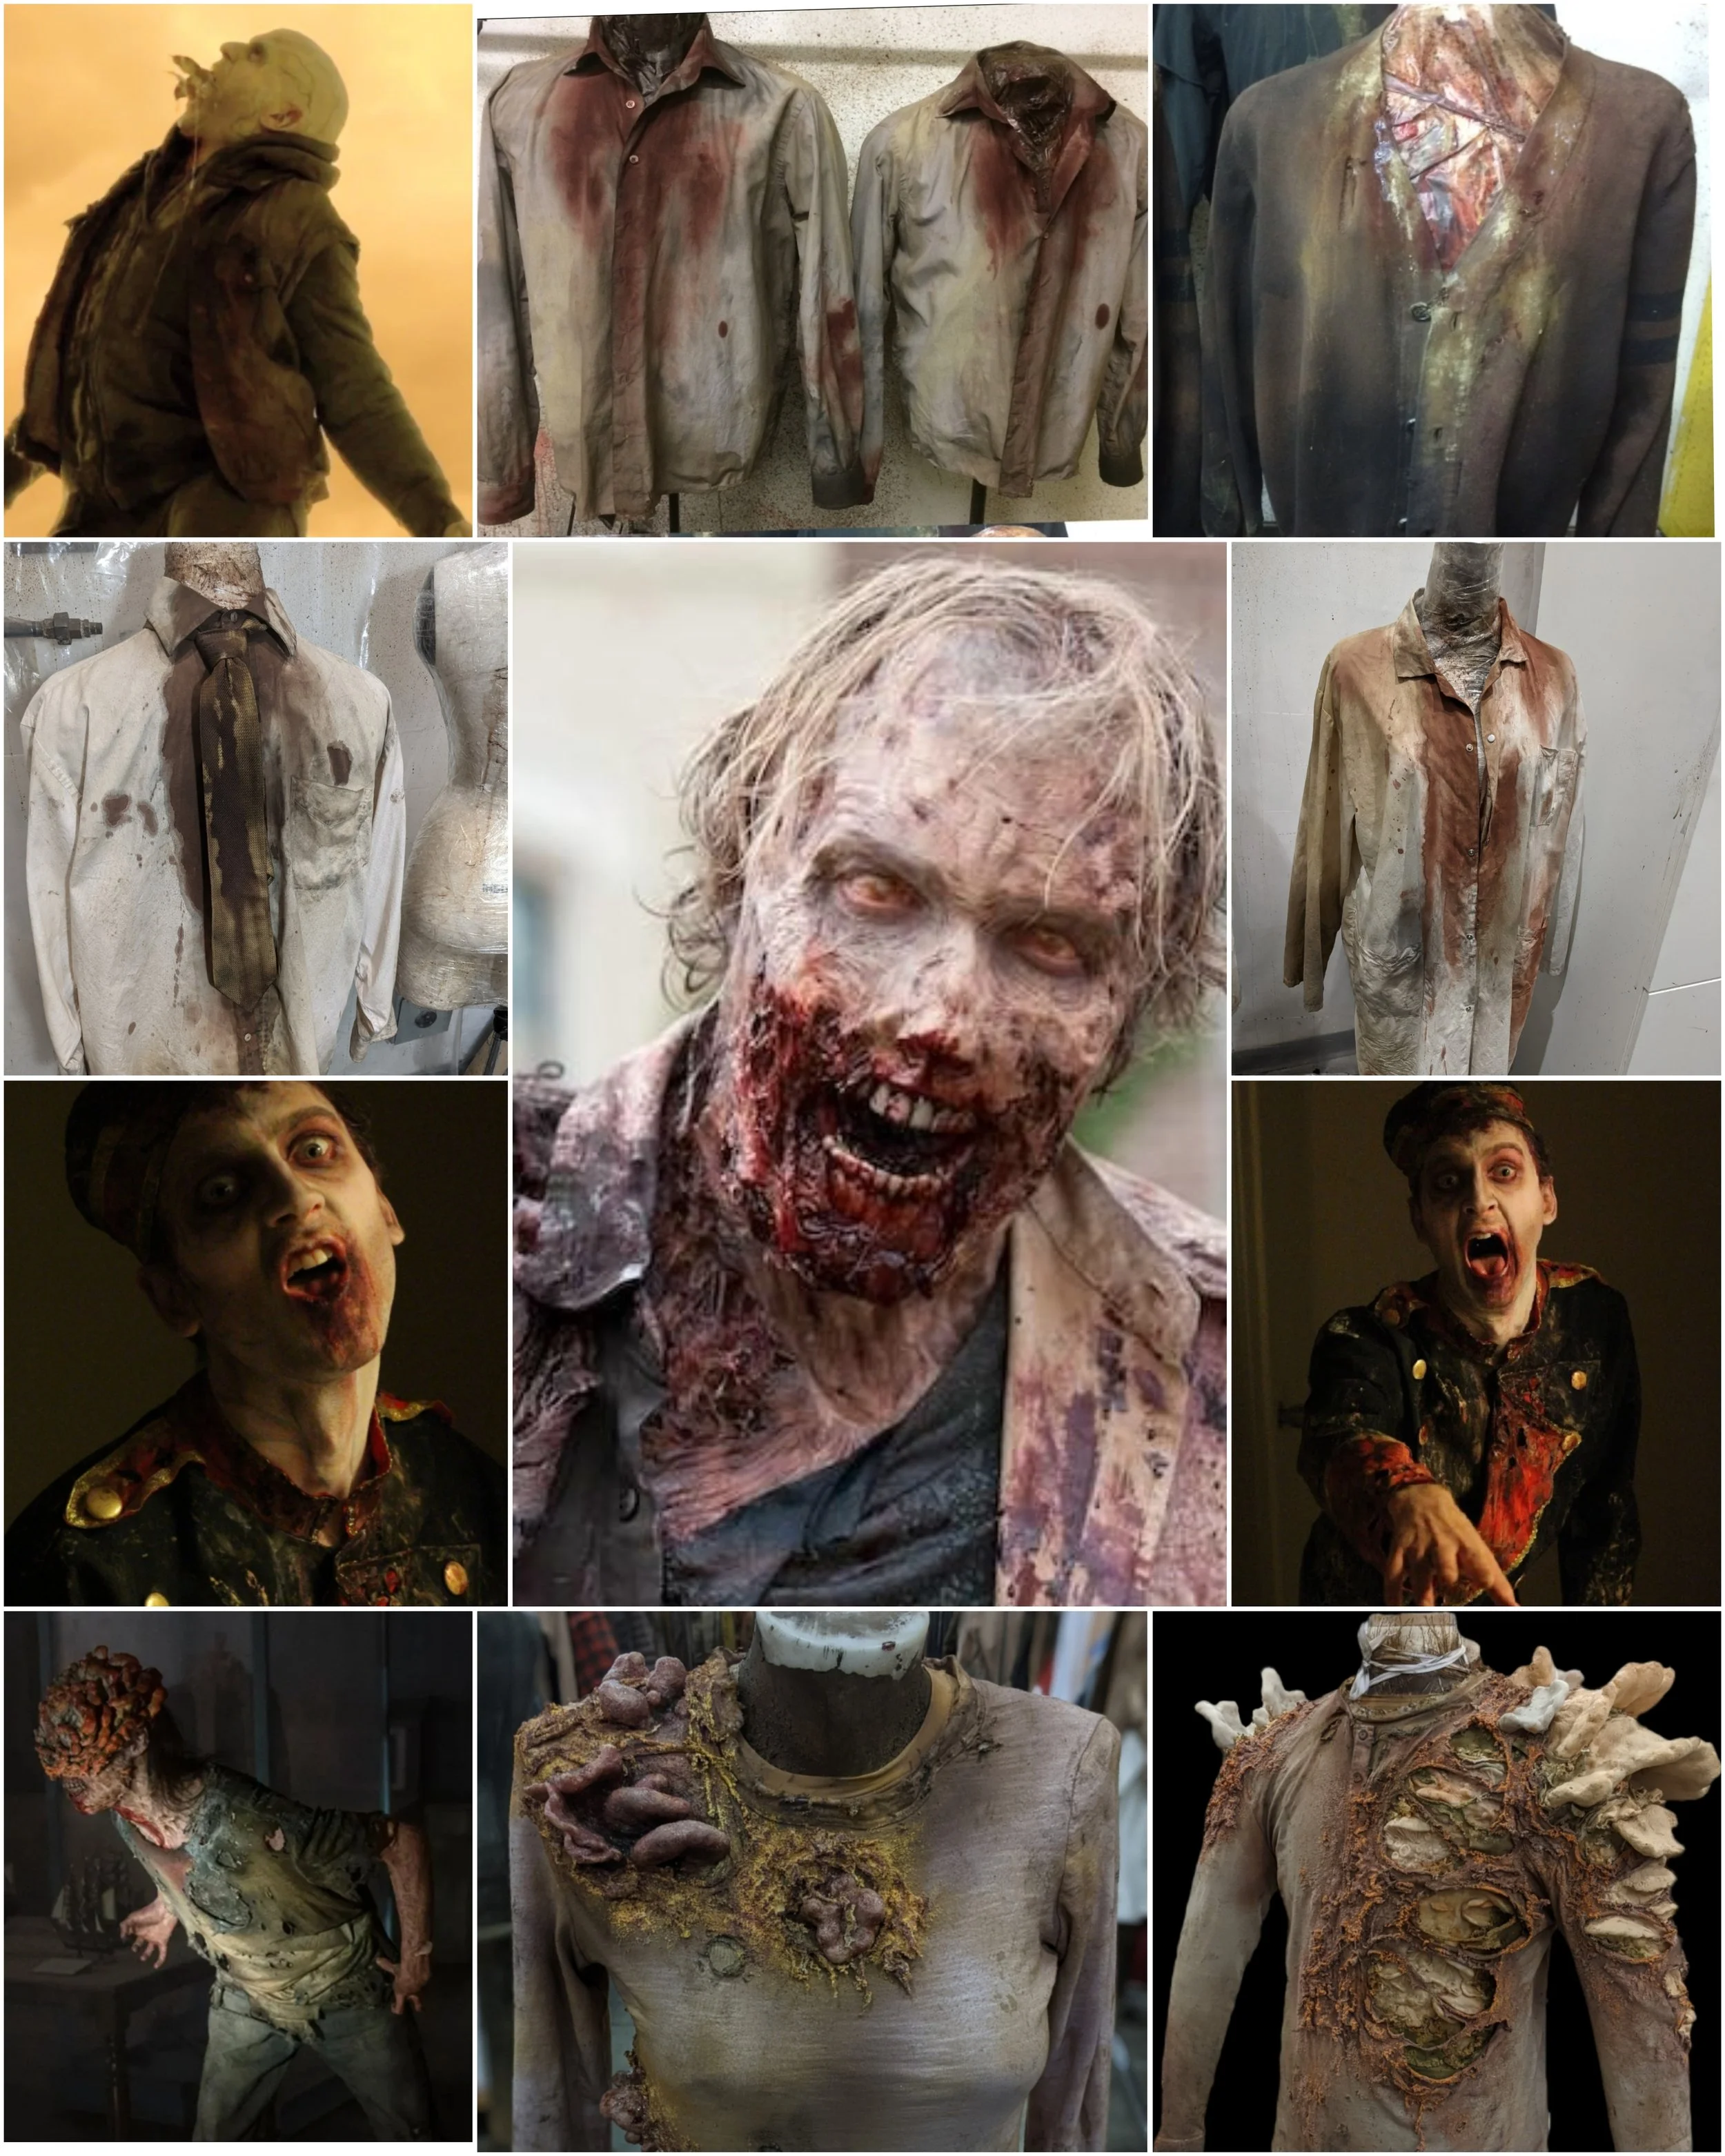
Sarah “Bloodstain” Blostein’s work on zombies. Row 1: Stregoi from The Strain, Season 4. Costume designed by Delphine White Crane. Row 2: Dead Bodies from Y: The Last Man, costume designed by Olga Mill. Row 3: Zombie Bellhop from Halloween Costume. Row 4: Clickers and the Walking Dead Zombie (centre) from The Last of Us, Season 1. Costume designed by Cynthia Summers. Image courtesy of Sarah “Bloodstain” Blostein.
What is the most prized tool in your breakdown kit?
That’s a tough one!
For making blood, it would have to be this one particular colour of acrylic paint that has sadly been discontinued. I have a few bottles of it hoarded away in my kit, but once that is gone...eep! It really is the perfect fresh blood colour and it is the base colour for mixing any shade of blood (e.g. fresh, oxidized, aged, zombie etc.) I also covet a specific type of spritz bottle for blood work.
In terms of actual fabric distressing, either a good steak knife or an olfa blade. And I do love my dome brushes!
TIPS AND TRICKS
Best tips to keep blood and dirt looking fresh on clothing throughout shooting?
My best tip is to make it permanent – this is my specialty. Don’t wait to do the blood on the day; instead, pre-set the blood with a medium that makes it look wet and you don’t have to worry about freshening it up or having it bloom too far and mess up continuity. The same goes for sweat and dirt.
This is of course more difficult when scenes are shot out of order, which so often happens (why does scheduling hate us?), but if you create multiples of the costume with multiple levels of blood in various stages of wetness, dryness, coagulation and oxidation, it makes it much easier for the set costumer to track and takes the guesswork out of it. I know a lot of directors like to wait until the day of to do blood, but if you are able to convince them it’s in their best interest to have it pre-set, – it will save them time and money – it usually works out for the better.
This is one of the reasons why I feel being able to break down a script is so important for a Key Breakdown Artist. We are the ones who can make or break a story for a viewer if the continuity is off or the breakdown doesn’t make sense for the action. It is for this reason I also feel it would be helpful for breakdown keys to be part of meetings and read-throughs in episodic TV: so much can be lost through the broken telephone of information being passed down from department heads. It would also save the Designer and Assistant Designer the task of having to field a barrage of breakdown-related questions from the Key!
Best tips to keep the cast comfortable while wearing bloody clothing?
Again, I’m going to have to go with pre-setting permanent blood on costumes. I love using liquid latex or silicone to create that shiny wet look on clothing. Yes, it might feel a bit weird (even cured silicone can feel a bit icky) but it is dry and the actor can wear a thin layer underneath. This is also a great way to cheat a drenched-by-rain look on an actor without them freezing to death during filming.
Best laundry tips to freshen up bloodied clothing without damaging the breakdown work?
Spot clean. I find that often in breakdown, despite using GAC-900, Transparent Base, or other fabric-setting mediums, there is very little time to properly heat-set a garment before it goes to set. Sometimes, even if you do everything right, breakdown will still come out in the wash.
The safest way to ensure continuity is to spot clean, and multiples are also key. I like to make three to four multiples for each level of blood or dirt, especially if there is heavy action in a scene. Things like KY and glycerine can be used to add extra shine if permanent blood becomes dull over time. There are some brands of silicone-friendly stage blood that can be used, but I find adding anything other than shine can risk colour transfer on a garment and becomes more trouble than it is worth.
How do you keep your mental health on track when working on a particularly gruesome project, day in and day out?
Well, here’s the thing: you don’t! What I mean is, if you really love the blood and guts, like me, you end up revelling in it.
I know a lot of Breakdown Artists who don’t like doing blood because they aren’t “into” horror and it “icks” them out. But if you already have the kind of twisted mind that gets excited when you see a really convincing and particularly gruesome decapitation or head pop in a movie, working on this type of thing actually gives you energy, because you feel you are doing your best work. It becomes a masterpiece, and you get lost in the nuances of colours and textures. When I can hand something to the Designer and they say “eww, I hate it,” it makes my heart swell with pride, like a gold star or a pat on the head.
When I was up to my elbows in whale guts on season two of The Boys, people in the department kept saying, “you poor thing, I bet you are counting the days until this episode is over,” and I was just like, “nope, I’m having the time of my life!” That was actually the episode where I was given the nickname “Bloodstain” by a fellow costumer who walked through my abattoir of a workstation.
Honestly though, there are some tougher projects to work on. For example, having to look up reference images for really violent deaths like torture, or especially plane or car crash victims, can be tough. You see images of bodies that are mangled in ways you can’t even believe, and that messes with you a bit. I can only imagine how much harder it must be for SPFX makeup artists and sculptors. But you do get desensitized to it after a while.
A funny thing about me though is I’m not good with real gore. I think it’s the smell – it makes it too human. I’ve had people comment on images of my work, saying things like, “that must have smelled so bad!”. If I can gross an audience out to the point they can imagine the smell, I’ve done my job right!
Watch a behind-the-seams video of Sarah’s work here.

ANDREA URRA MOYA
12 MIN READ
Passionate about the craft of breakdown, Andrea Urra Moya has worked on projects that took her back in time for Shōgun and to dystopian futures in The Last of Us and Snowpiercer. Andrea was a Breakdown Artist on the Snowpiercer team that won the 2023 CAFTCAD award for Costume Design in TV West – Contemporary, and was nominated for Costume Design in TV – Sci-Fi/Fantasy. Andrea shares her love of breakdown and her experiences working on these beautiful projects with some of our industry’s most talented artists.
Connect with Andrea: @andrea_urra_art

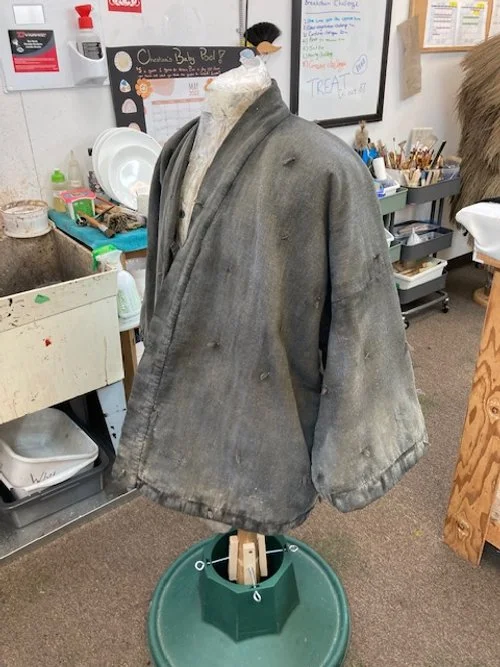
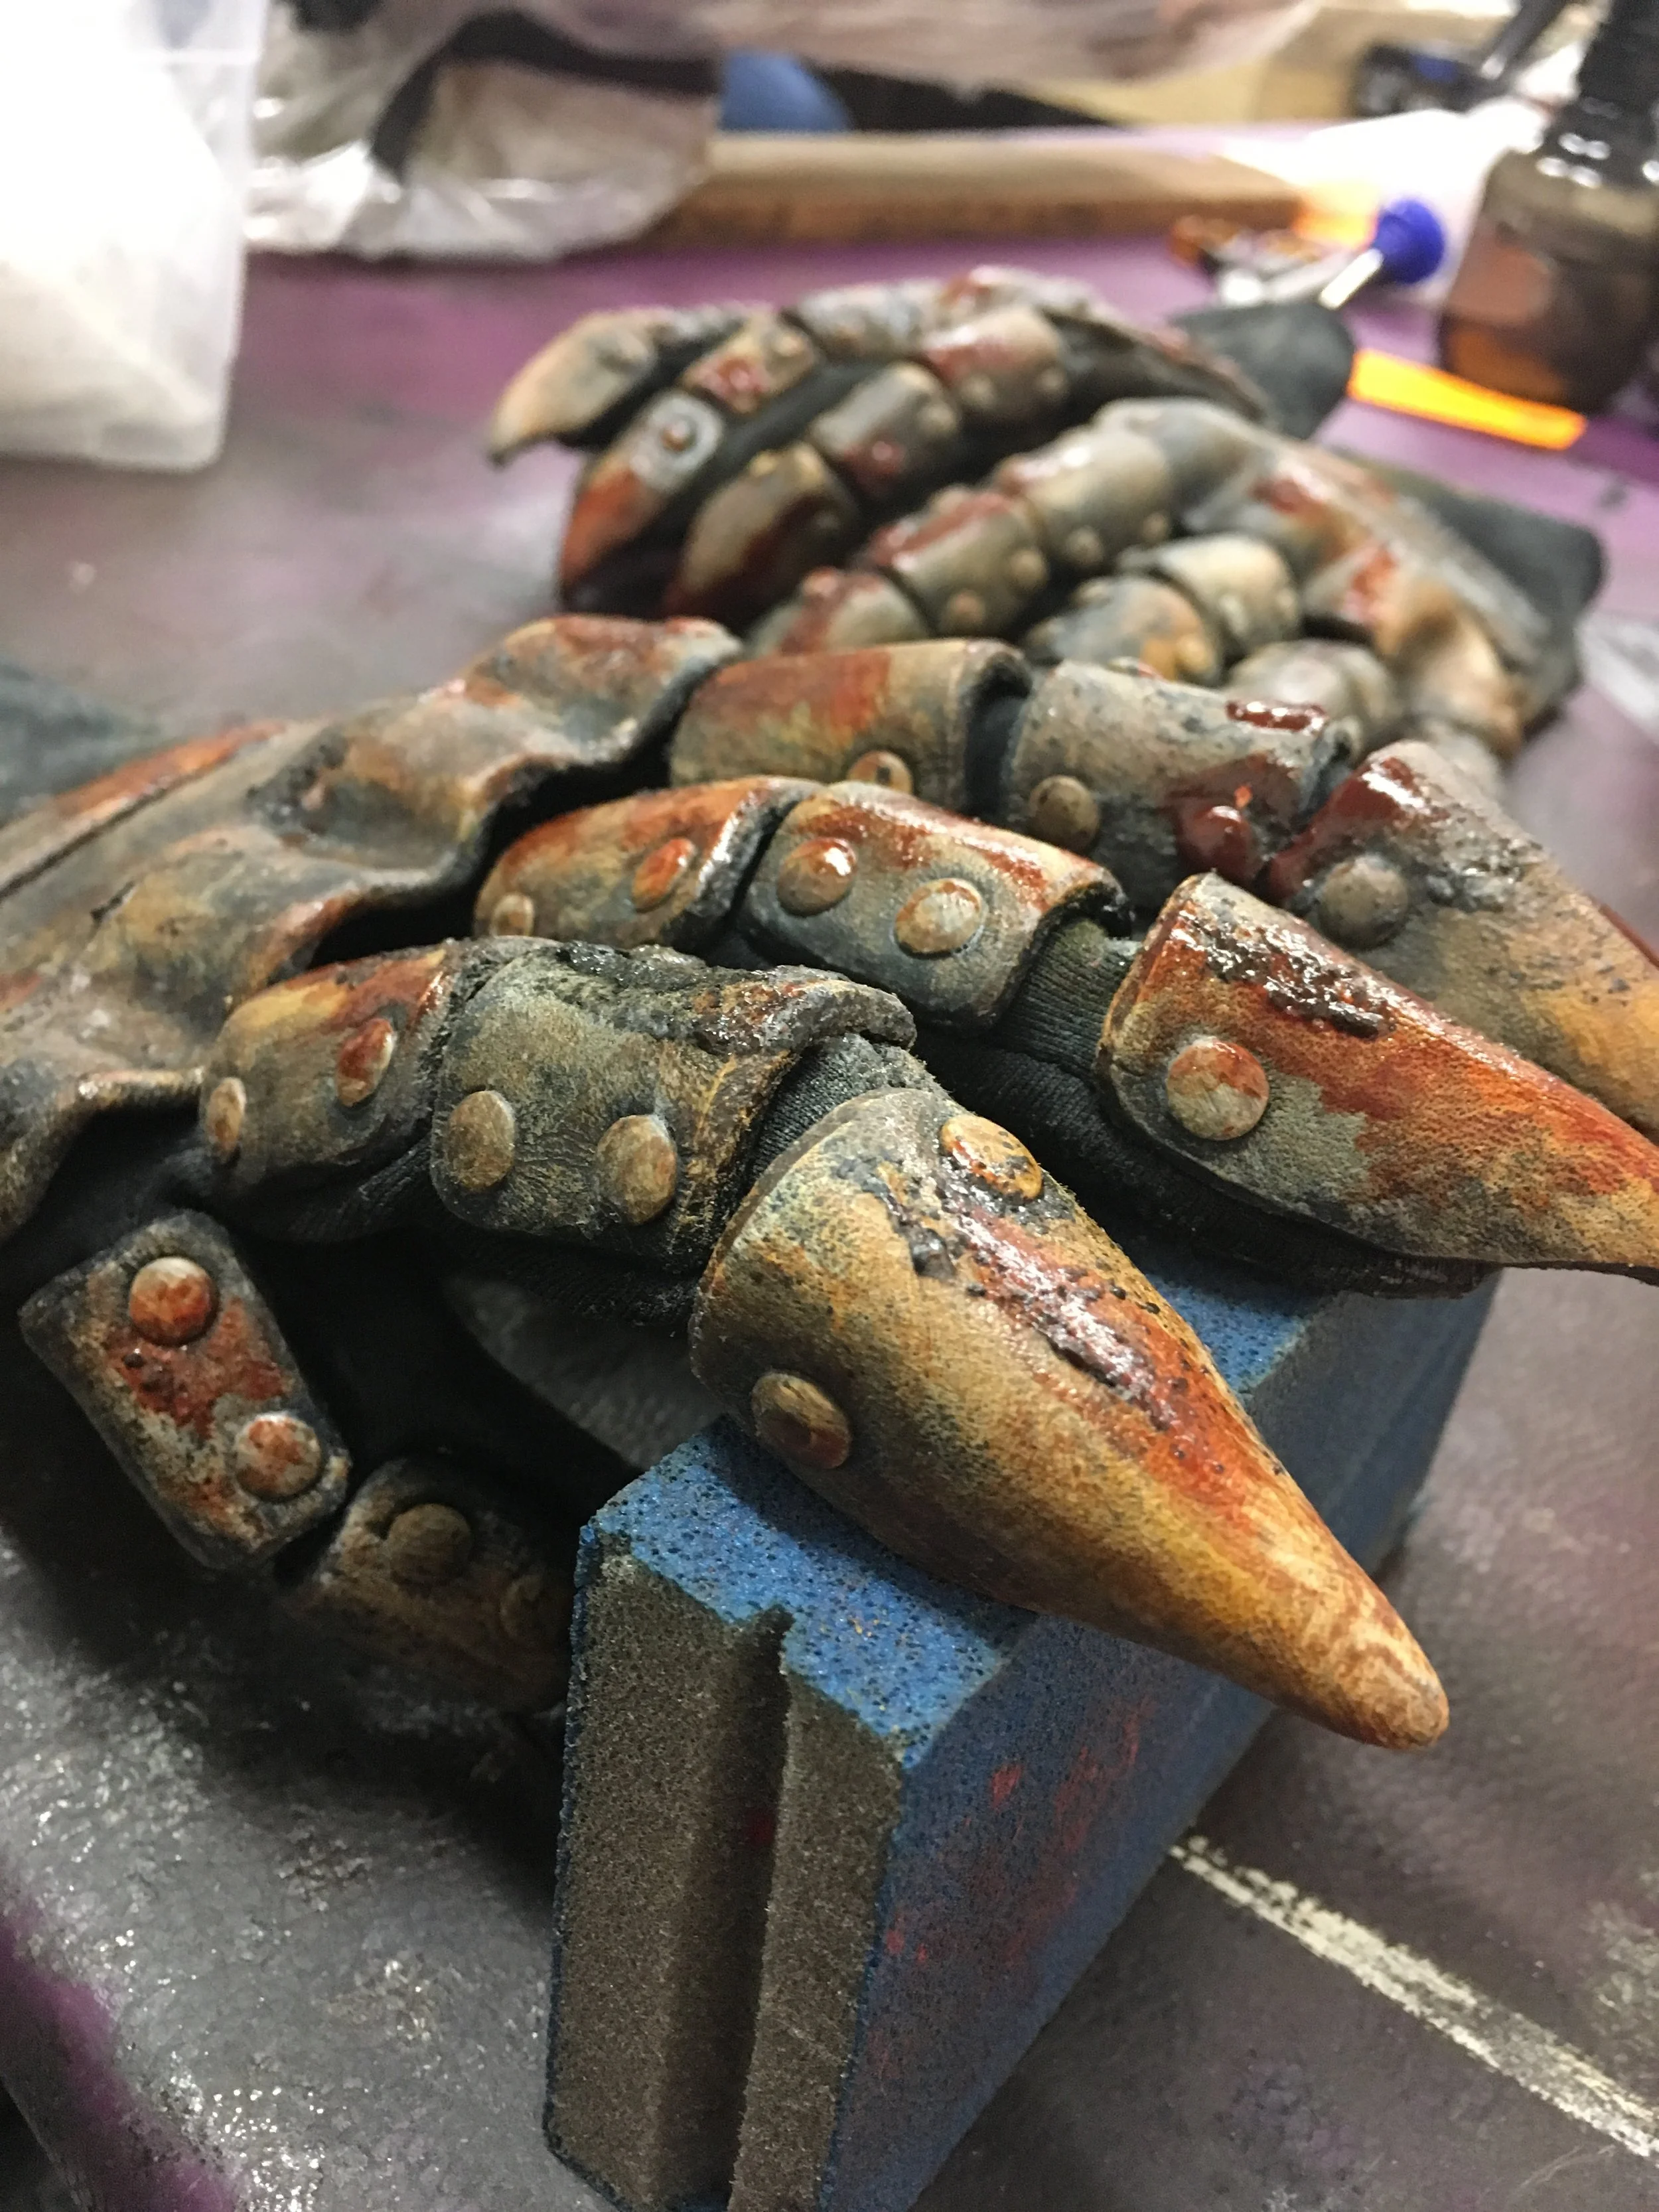
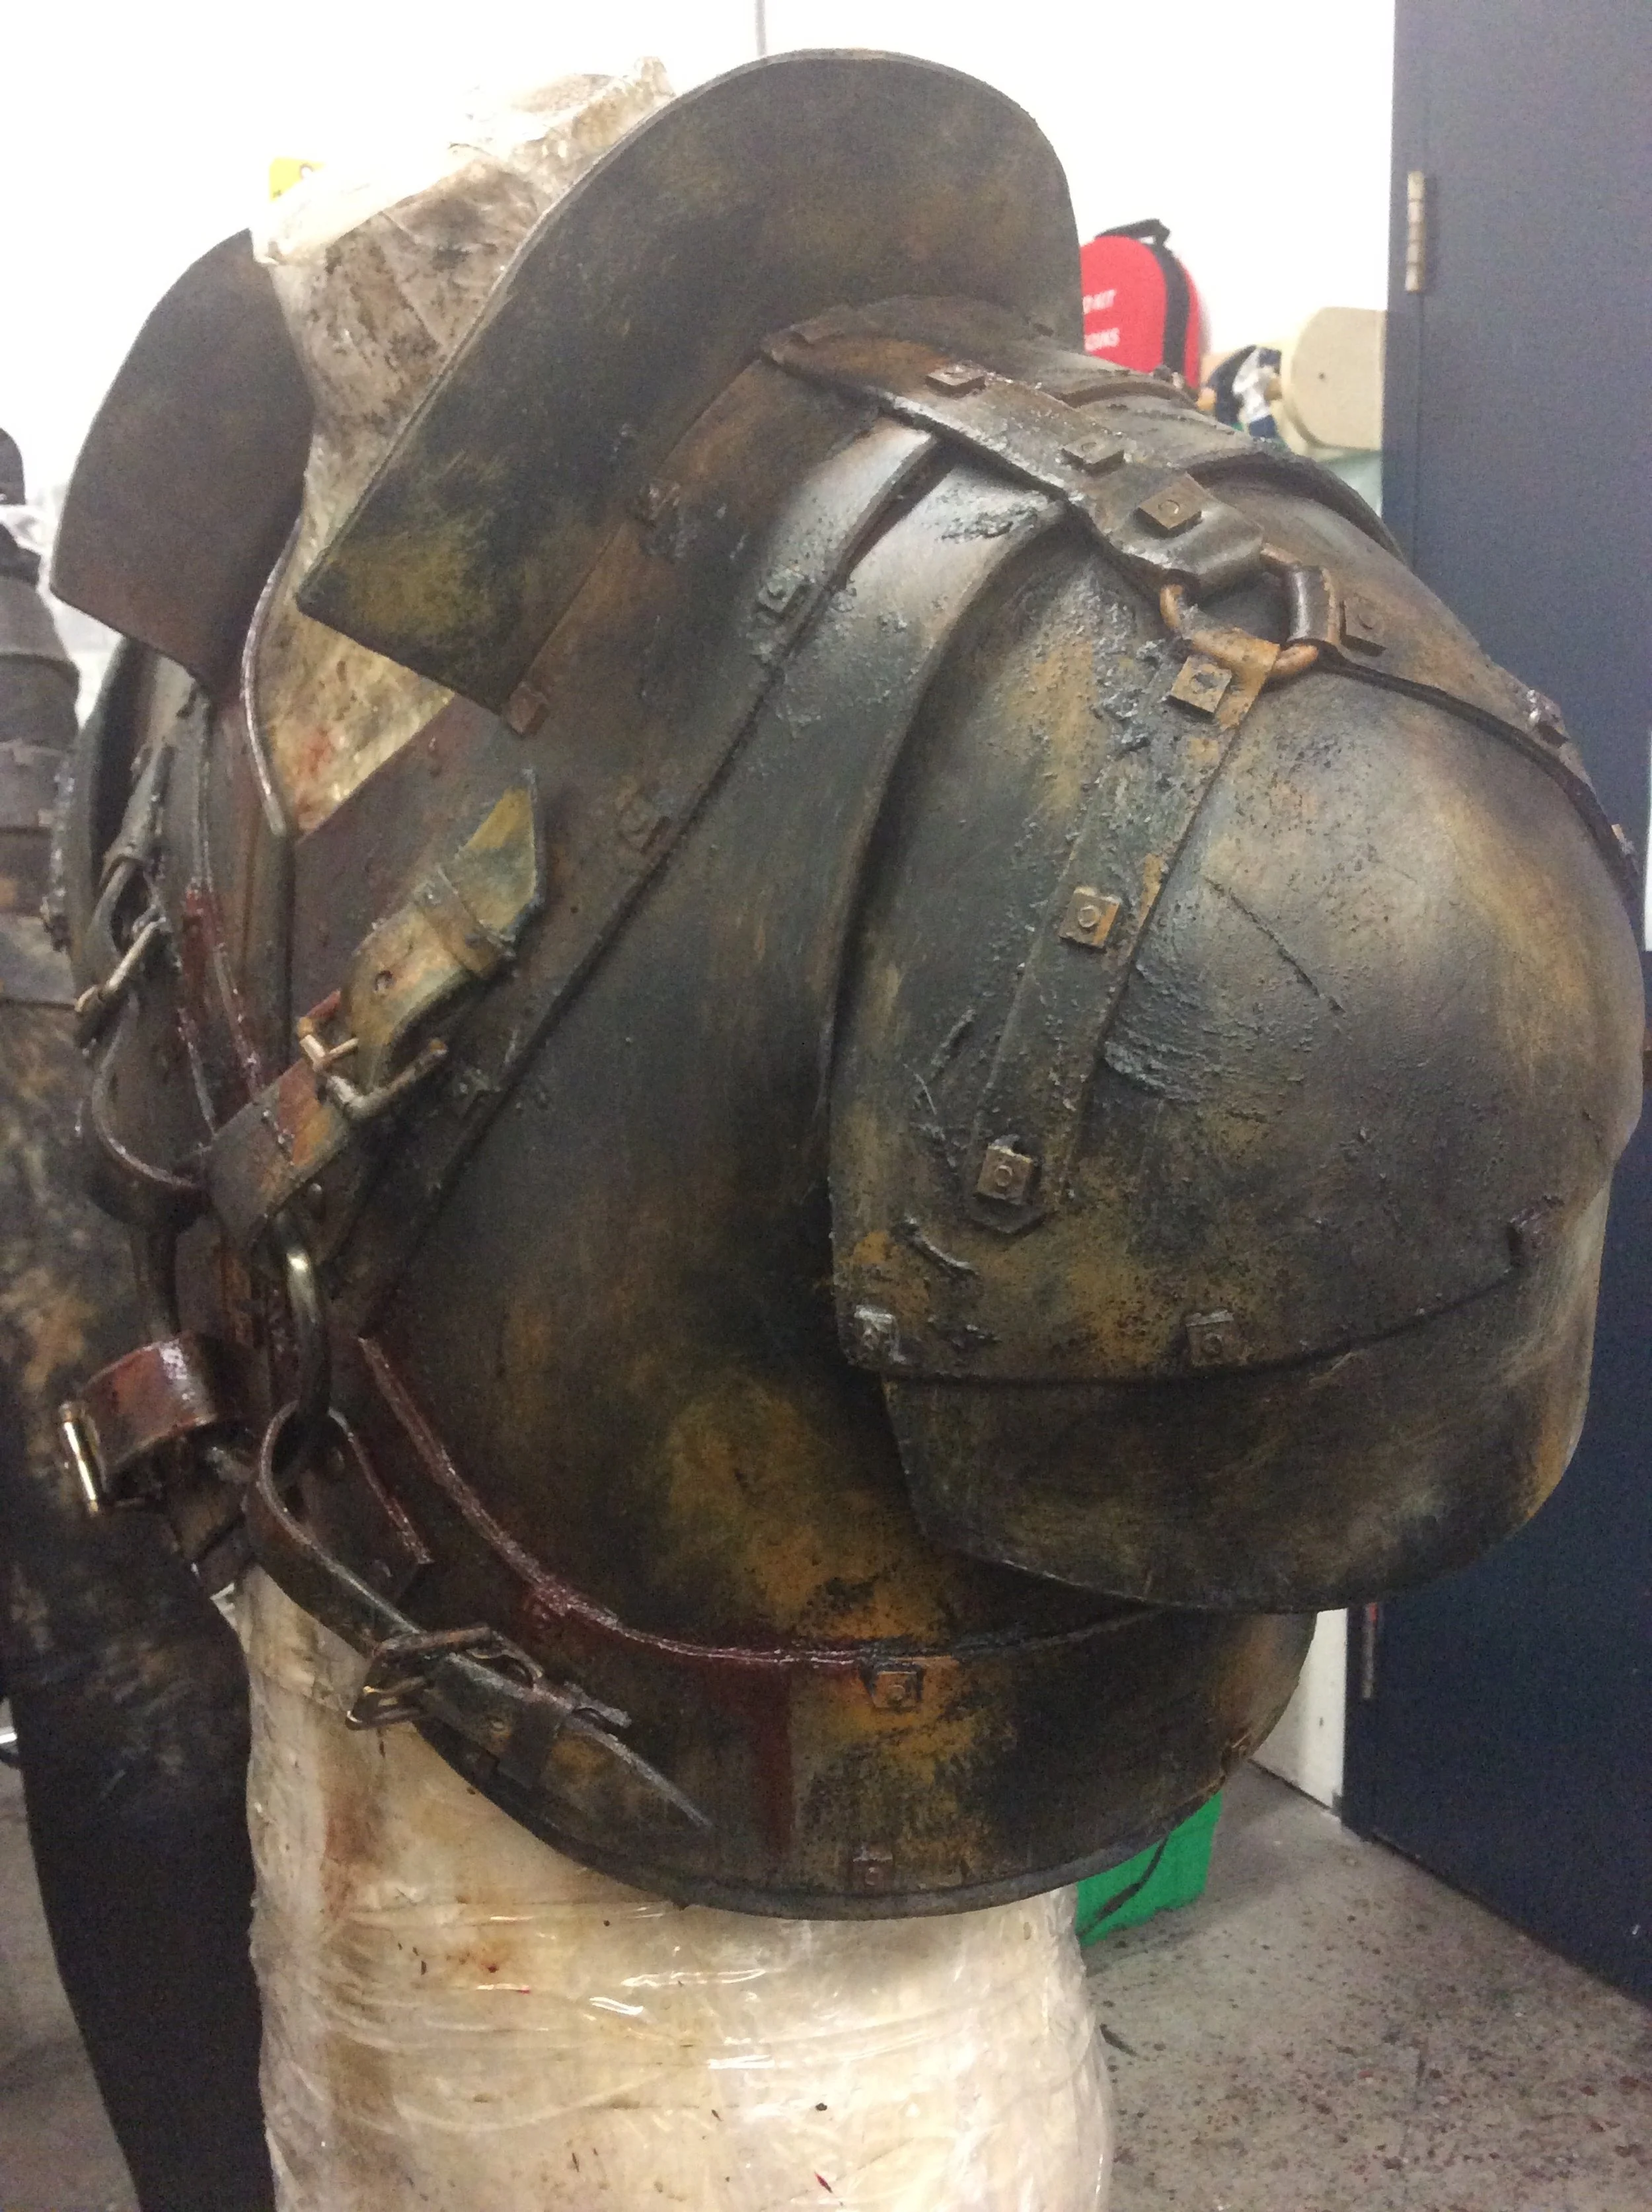
Armour from Shōgun. Costume designed by Carlos Rosario. Image courtesy of Andrea Urra Moya.

Armour from Shōgun. Costume designed by Carlos Rosario. Image courtesy of Andrea Urra Moya.
In Shōgun, the Samurai armour is stunning. When working with such materials, how do you determine what your approach to breaking the garment down will be? What were some of the challenges to create breakdown on all those unique pieces?
Shōgun holds a very special place in my heart. It was the first time I truly experienced such a breathtaking commitment to detail, from the kimono masters and the thoughtfully curated catering to the Designer’s poetic vision of beauty and authenticity. Costume Designer Carlos Rosario led the team with that spirit, allowing us the rare luxury of working with time-honored breakdown techniques often overlooked in faster-paced productions.
When I arrived a month into filming, a strong aesthetic language had already been established, especially within the armoury. Yet within that framework, each militia leader’s attire told a unique story – rich in detail, tradition and hidden meaning.
Our work always began with studying how real-life garments age: diving into historical references and observing how materials wear and breathe over time. From there, we shaped each piece through layers of paint, crafted abrasions, and delicate additions. Creativity was our compass both in developing the visual language and in solving the technical puzzles along the way, and always seeking the most efficient and inspired path forward.
One challenge that stole my heart was transforming plastic armour pieces imported from Japan into stunningly realistic metal – a meticulous and deeply satisfying process.
At the heart of it all was teamwork and communication. Whether crafting background costumes or hero pieces, every artist’s hand was vital to the final tapestry. Sharing ideas freely, leaning on each other during creative blocks, and daring to experiment brought a richness and pulse to our work that no individual effort could achieve alone. Respect, passion, and a spirit of collaboration wove through everything we did — and that, more than anything, made the experience unforgettable.
Can you tell us about some of the techniques you used to age and breakdown the animal skins for the mono-i-gutsu (leather shoes) and the mukabaki (deerskin coats) the Samurai wore for falconry in Shōgun?
We resort to a dance of techniques: a universe where trial and error intertwine and creativity is the compass that guides every step. In our world of breakdown, it’s not just about repairing mistakes, but about transforming each misstep into a unique work; a path to perfection that can only be reached when we accept there is no one right way to get there. Each of us has our own voice and our own style, but we all converge on the same goal: to capture the essence, the emotion and the feeling we are asked to convey.
For example, for the feathers we use petroleum jelly to shape them and to make them look worn and forgotten by time. The petroleum jelly, with its silky texture, can be mixed with powder paints, giving a subtle colour shift as if each feather is telling its own story. Animal skins are no different: they can be treated with petroleum jelly, acrylics, or even dyed and combed, as a tribute to the life they once held. Leather, on the other hand, becomes more flexible and alive with steam, a caress that makes it softer.
Costume from Shōgun. Costume designed by Carlos Rosario. Image courtesy of Andrea Urra Moya.
Armour from Shōgun. Costume designed by Carlos Rosario. Image courtesy of Andrea Urra Moya.
In a dystopian scenario such as The Last of Us, or the wilderness plane crash in Keep Breathing, characters aren’t changing their clothing often and live quite rugged. How do you create a breakdown aesthetic for hero pieces to show the passage of time?
Working on Keep Breathing was a true dance of trial and error; an ode to imperfection. Trying to replicate the exact same stain on a white poplin shirt fifty times became a beautiful challenge.
We broke down the script into five distinct phases of costume evolution: clean, lightly stained, increasingly soiled, bloodstained and finally water-worn, with each stage telling a deeper story. We aimed for a natural organic progression and let real physics guide us: moistening the fabric before staining so the mark would bloom like a memory on the cloth. We leaned heavily on airbrush techniques, stencils, and even full-size photocopies of the garments to replicate every detail with almost obsessive precision.
Then came The Last of Us – a transformative experience that felt like stitching pieces of our own hearts into the work. The team – many of whom had journeyed together from Shōgun – grew into something luminous: creatives full of spirit, thoughtfulness, and deep camaraderie. Our leads trusted us deeply, which opened the gates to experimentation and creative problem-solving.
For the fabric breakdowns, my favourite technique remains the most primal: using rocks. We placed stones under the fabric, then sanded with pumice, wire brushes, or coarse sandpaper, allowing the material to tear and fray in ways only nature can teach. We used a grading system: level one for surface dirt, level two for small holes, dirt, and flecks of blood; and level three for pronounced tears, layers of fresh and old blood – a map of survival etched in fabric.
Each person’s hands, each creative instinct, added new layers to the story. Breakdown work at its best becomes a language of time and resilience, whispered through the threads and woven into the soul of the character. It sounds very poetic, but for me it's true.

Shoes from The Last of Us, Season 2. Costume designed by Ann Foley. Image courtesy of Andrea Urra Moya.
One of the many fabulous details in The Last of Us is the realism of the characters in their lived-in everyday clothing. Where do you source reference material for these types of breakdown looks? (e.g. The wear patterns on a well-loved pair of jeans, or what a jacket could look like 10 months into an apocalypse.)
The first spark always comes from the Designer’s vision. She brings a concept – sometimes broad, sometimes deeply visual. From there, our Supervisors or even ourselves craft samples – small offerings of possibility to present back to her. Once she approves, the creative dance truly begins, and we are free to express ourselves within the world she has imagined.
Personally, I find my inspiration everywhere: in the little frays on a commuter’s jacket, the sun-bleached knees of an old pair of jeans, the worn edges of a beloved canvas bag. I delve into the endless libraries of the internet, into photo banks, into life itself. I ask my teammates, those with deeper wells of experience, for tricks and shortcuts to achieve a specific texture or feeling.
Once a reference resonates, the next phase begins: the alchemy of replication. We build wear layer by layer: starting with physical abrasion, then moving to washes with detergents or chemical agents like trisodium phosphate (TSP) to accelerate the story of wear. Each step is slow and intentional, like weather shaping stone.
Many of us keep personal treasure troves, such as photographs from past projects, but the true magic is that there is never just one formula. Each artist’s hand is different, and each technique a different dialect in the language of storytelling through fabric. The essential thing is to stay true to the story and the character’s soul while respecting the creative direction we have been given.
Finally, we add the touches of paint: sometimes acrylics, sometimes airbrush, washes, or however our imagination guides us. We always use hypoallergenic products safe for the actors’ skin. Lastly, the piece passes through the hands of our Supervisors for a final polish, small adjustments if needed, and then, voilà, the garment breathes its new life into the story.
You previously mentioned The Last of Us was your first time working with blood in breakdown. What elements of blood work surprised you, and how did you prepare for working with this medium for the first time?
I had the incredible fortune of working alongside my friend Bunny, an exceptional artist whose deep well of knowledge became a springboard for playful exploration. What began with traditional techniques soon blossomed into a creative symphony of new ideas – such as latex, glycerin and gelatin – with each material unlocking new textures and new stories. The world of blood was vast and wild: fresh blood, old blood, removable blood, thick blood, blood for airbrushing, blood for spraying; it was an endless river of crimson possibilities.
Watching Bunny and my teammates in action flung open a door inside me: a door to endless invention. I learned to reimagine tools, to borrow from one world and reshape it for another, and to dive into chemical reactions and find unexpected textures blooming on fabric and paint. That door has stayed open ever since and I hope it never closes. To play, to rediscover, to reapply and to remain endlessly curious keeps the scientific spirit within me, alive and vibrant and dancing at the very edge of creativity.

Sweater from The Last of Us, Season 2. Costume designed by Ann Foley. Image courtesy of Andrea Urra Moya.
TIPS AND TRICKS
Best laundry tips to keep wear and tear looking consistent on clothing throughout shooting without damaging the breakdown work?
I believe there is no true miracle when it comes to laundry – every wash leaves its tiny mark, a whisper of time passing, no matter how careful we are! But there are tricks we hold close like secret spells: for example, many of the paints we use are heat-set, so we dance with the iron and the tumble dryer, locking the colours and textures into the very soul of the fabric.
Also, everything we apply must always be hypoallergenic. Working in costume is not just an act of creation, it is an act of care – of protecting our fellow artists, our actors, the living vessels who bring these characters to life. Teamwork shines brightest when it embraces not only the art, but the hearts of everyone involved.
Best maintenance tips to keep wear and tear looking consistent on clothing while shooting and sustaining real life wear and tear by the cast?
As I mentioned before, it is almost inevitable that with every wash, with every day lived in character, the fabric whispers away little bits of color and detail. It’s the nature of life, and art breathes with it.
When time is our ally, we create multiples, keeping one precious piece for ourselves – our anchor, our memory – to guide future touch-ups without disturbing the story’s flow.
But when time runs like wild horses and multiples are not an option, creativity becomes our most loyal companion. We turn to photographs, full-sized photocopies of the costumes, and our beloved recipe sheets: sacred maps filled with detailed notes, colours, and techniques.
Each recipe is a love letter to continuity, crafted so that any teammate, holding it in their hands, can step into the process and restore the garment’s soul with understanding and heart.
How do you keep your mental health on track when working on an emotionally heavy project?
I believe the true key lies in the heartbeat of the team: in the friends and companions who walk beside you on this intense journey, and in the burning passion for what you create; to savour the work, to dance with it, but also to nurture yourself with fierce kindness. No one can care for you better than you can, and when the weight becomes heavy we must listen and act without hesitation, whether the wound is of the body or the spirit.
I've been blessed: most of the leaders I've worked with have been beautifully aware of this balance, always reminding us that if we need to step away to breathe or to heal, they will make space for it. We live in a time when old chains can be broken; when caring for the spirit is no longer a silent act, but a brave and luminous one. We are learning, day by day, to protect our own flame – not to let it flicker into darkness, but to let it dance ever higher, ever brighter.

ANNA PANTCHEVA
10 min read
Textile and Breakdown Artist Anna Pantcheva’s days are filled with unique challenges that require creative solutions. From the stunt-safe Klingon armour in Star Trek: Strange New Worlds to customizing blood drop beads for the stunning headpiece in What We Do In the Shadows, Anna’s work with dyes, paints and bloods have been nominated and won many CAFTCAD awards, including the 2023 CAFTCAD Awards for Excellence in Crafts – Textiles for Star Trek: Strange New Worlds. The series also took home the Judy for Best Costume Design in TV Sci-Fi/Fantasy that year.
Anna was twice nominated for a CAFTCAD Award for Excellence in Crafts - Textiles for What We Do in The Shadows in 2020 and 2021, and received a second nomination in the same category for her work on The Boys in 2021. Here Anna shares her favourite products, the challenges of working in a breakdown department, and her genuine love for her craft.
Connect with Anna: @anna__pantcheva
Your projects cover everything from period looks in What We Do in the Shadows, a dystopian society in Riot Girls, sci-fi with Star Trek, and contemporary in Reacher.. What are some of your favorite products or tools in your kit, and why?
I have a lot of tried and true star products that I’ll make work in many ways. A few of my favourites are: my air brush and compressor. I always stock Golden Acrylics paints, specifically in the Shading Grey and Sepia colors. The Shading Grey is great for shadow and the Sepia is perfect for an earthy warm brown. When mixed together, it makes a believable neutral dirt.
Another staple in my kit is silicone Smooth On 20 Eco Flex.
My favourite blood is Fleet Street Dark. I know a lot of people love Mind Warp, but for me, Fleet Street is the best. It dries nicely and has a fantastic viscosity. When working with a designer who prefers acrylics on their breakdown, I always get tones that match the Fleet Street colours.
There’s always Ultra-Matte Medium in my kit; I love it for dulling things down. If you mix it with a dot of raw umber, it’s perfect for breaking down things like Converse (there’s always Converse shoes on a show). I also find it works great on dark boots – if you sand the boots down and add a bit of the Ultra-Matte, it really works on camera.
Some other paints I enjoy working with are Modern Masters Metallic Paint; you’ll often find them in sci-fi interiors as scenic painters commonly use them. It’s a product that’s extremely durable and reads beautifully: it has a metallic finish and works great on leathers and underneath foiling. Sometimes in breakdown, you are bringing items back to life instead of breaking them down: we make items look new again, do repairs, or even take something back that’s gone too far. I’ve had pieces come in from a thrift shop that the Designer loves, but we need to refresh it and make it look new again. A product I love working with for some of these repairs is Angelus Leather Paint.
For dyes, Dylon Multipurpose cans are another go-to for me. I also work with Rit Fast Fade quite often;. it’s great for fading tees and jeans to give them a proper vintage look. But it is a product you have to be careful with: if you go overboard with it it’ll look bleachy, but for contemporary projects, it’s perfect to create a vintage feel. Manhattan Wardrobe is where I source the Fast Fade.
Scene from Killjoys. Costume designed by Trysha Bakker. Image courtesy of Anna Pantcheva.
Star Trek and Killjoys both present unique opportunities for textile artistry. With futuristic space settings and lots of action, what are some of the challenges of creating garments that visually make sense but also stand up to the wear and tear of stunts?
The challenge in the sci-fi world is always the metallic finishing and foiling, especially when it comes to the stunt costumes. Making it stay on during impact or having a method to repair it quickly is a big part of it.
In Star Trek, with our elaborate spacesuits and the Klingon armour, we have to create multiple sets for cast and stunts. While these pieces may look the same, anything going on the stunt performers has to be made of soft materials; we have both a full-time SFX Sculptor and SPFX Builder. The Sculptor molds soft versions of the armour out of foam and sometimes PTFE – this means I am often working on soft surfaces that are cheating for pieces of armour or helmets, and I have to find a way to create the same illusion on this soft surface that I can achieve on a hard surface.
These different materials need to be painted with different products to ensure the paint won’t crack during the action – we use non-toxic water-based paints for this. They’re durable and stand up to a lot of stress from the action, but even so we often do a lot of repairs and refinishing. At the end of the day, no matter what, when it’s moving and there is an impact, it will eventually chip.
How does the process of creating breakdown looks differ for a series like What We Do in the Shadows – which is shot documentary style – versus a series like Cardinal, which is grittier and more cinematic?
Shadows is a comedy and there is a lightheartedness to the blood and the breakdown; it’s always aiming to be a bit more theatrical and over-the-top than a contemporary show.
I enjoyed seeing Costume Designer Amanda Neale’s comedic vision of the costumes. She found ways to reference blood in inventive ways: I’m thinking of the beaded blood drop headpiece I made for vampire Nadja to wear. A little-known fact is I had to actually colour the blood drop beads myself since there were none to be found in the shops in Toronto. I used a solution of glass paint; this worked perfectly because I was able to control the colour to be like blood, and the glass paint gave a shiny translucency that looked a lot like blood.
Cardinal felt far more disturbing – the horror in the story was more real and psychological. The blood was more real in a way, and less theatrical.

Behind-the-scenes from Star Trek: Strange New Worlds. Costume designed by Bernadette Croft. Image courtesy of Anna Pantcheva.
Walk us through a project. What is your process for mapping out and executing the textile artistry or breakdown work for a piece?
I love our process on Star Trek: Strange New Worlds. After three seasons of working on it with Costume Designer Bernadette Croft, we really have a great system.
We start from an illustration of a costume and meet once a week around a table with myself, the ACDs and the other Keys (the Key FX Builder and Key FX sculptor). This gives us the opportunity to express our concerns and ideas, as well as hear other people’s concerns and ideas based on what we see in the illustration and what we know about the schedule. We talk about timeline and materials, and what processes we feel are compatible.
From there I’ll make samples – often for colour matches, screen printing or foiling. Sometimes the illustration is more interpretive and there is more room for creative exploration through my sampling – like in our Deleb alien creature we did in season one. This character’s costume was born out of play and experimentation – almost in a stream-of-consciousness – with the illustration as a jumping-off point.

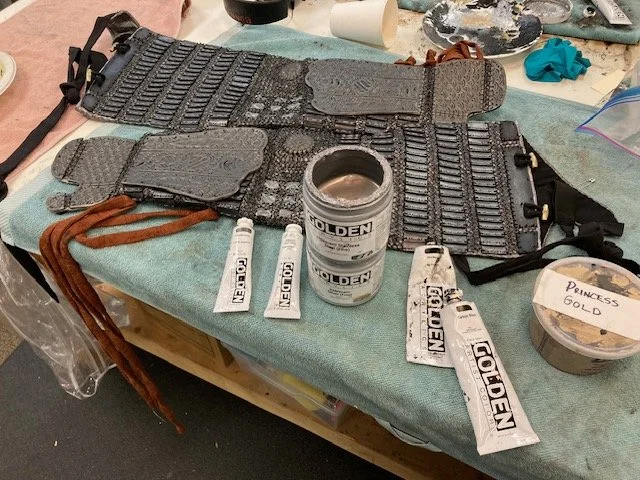
Swatches from Star Trek: Strange New Worlds. Costume designed by Bernadette Croft. Image courtesy of Anna Pantcheva.

Close-up of costume from Star Trek: Strange New Worlds. Costume designed by Bernadette Croft. Image courtesy of Anna Pantcheva.

Close-up of costume from Star Trek: Strange New Worlds. Costume designed by Bernadette Croft. Image courtesy of Anna Pantcheva.
What do you do when something doesn’t go as planned with a piece? Perhaps the pattern isn’t looking the way you want it to, or the costume designer has made a change to the look of the piece after a fitting?
I think you have to accept that things evolve in the process, for better or for worse. Sometimes it feels rather remarkable if something ends up looking exactly like the illustration. Although that is what we strive for, there are always edits happening along the way.

Zombified Lieutenant Hemmer from Star Trek: Strange New Worlds. Costume designed by Bernadette Croft. Image courtesy of Anna Pantcheva.
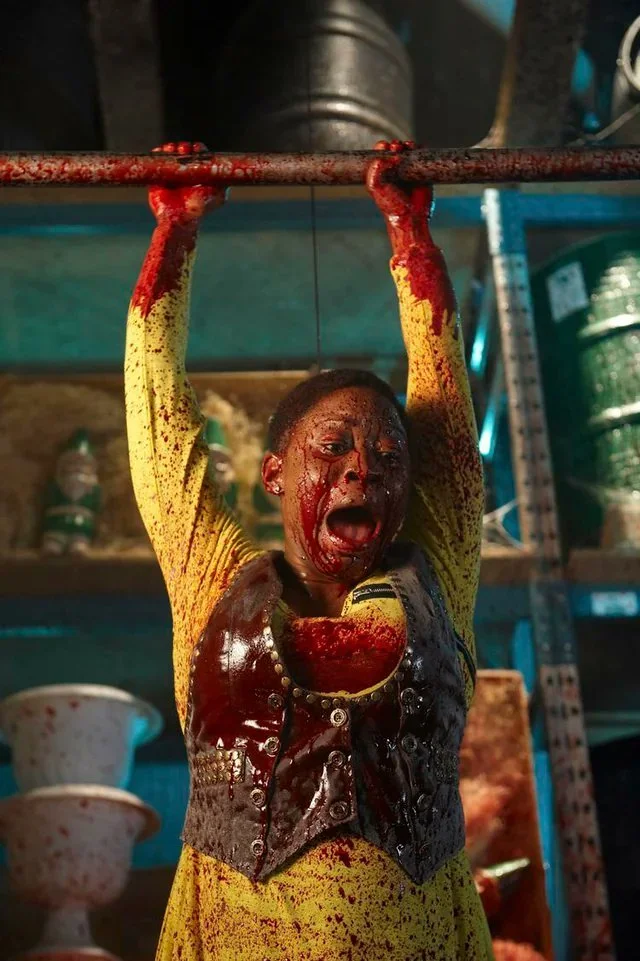
Often in projects with breakdown, most of the action is centred over one story night. How do you create consistent results for multiples? Not only for the cast and their stunt performers, but also for continuity, as these projects are shot out of sequence?
On the project I just wrapped, this was often the case. The story takes place over one week leading up to a big event and then at that event, everything happens. It was a series, and we often received the bookable schedules just a few days before we would start shooting that episode.
Mapping out the action ahead of time and creating stages for the pieces was key. Having great communication with the Designer and really understanding her vision was paramount to being able to have the pieces ready for the on-set team.
Our main look had four stages:
Stage one: Bloody hem.
Stage two: The blood has moved up a bit on the garment.
Stage three: More blood on the dress, and now it’s fresh and wet. (Silicone is used here.)
Stage four: The morning after. Wake up in a dried, heavily bloodied dress.
TIPS AND TRICKS
Best tips to keep blood and dirt looking fresh on clothing throughout shooting?
My favourite way to achieve the fresh blood look is in prep. I work primarily in my given breakdown/textile workroom, so my hand on the blood will often be to prep set it.
The challenge is that although set blood is marvellous on the day – particularly the Fleet Street blood – it dries too stiff to be believable on a garment. It is the same with acrylic paint. I recently ran into this on my current project where I was pre-setting multiple silk chiffon gowns and dress shirts.
What I love to do is to mix a procion dye to match the colour of the Fleet Street Drying Blood Dark and apply it to the garment – either by pouring or brushing on, depending on the effect. The procion dye is sheer like a watercolour painting and creates a lot of depth when it is built up. Then it gets steam set, and I’ll impregnate the dyed surface with a thin flexible silicone.
This is great for the performers because they can look wet for a longer time without actually feeling wet.
Best tips to keep the cast comfortable while wearing bloody clothing?
Wearing under layers, for sure. But also, the pre-setting that I mentioned above. The nice thing about the silicone is that you can apply blood on top of it and it remains a barrier between the set blood and the performer’s skin.
How do you keep your mental health on track when working on a particularly gruesome project?
I’m naturally pretty detached emotionally from the visuals because I see film as make believe; it’s like painting a canvas and all the little things in the picture. So there is a distance between my emotions and the tangible garments that make up the picture.
In need of dry cleaning services in Toronto? Visit Metro Cleaners in Scarborough for a comprehensive service.
TAMARA RIGBY-FUNKE
8 min read
Breakdown Artist Tamara Rigby-Funke’s love of her craft is evident in her work. From the hauntingly beautiful Nightmare Alley to the joyful whimsy of Station Eleven, Tamara has used her talents to bring many unique projects to life. Winner of the 2023 CAFTCAD Award for Excellence in Crafts Award - SPFX Building for her work on Station Eleven – which was also nominated that year for the Excellence in Crafts Award Textiles category – Tamara shares how Station Eleven was able to create different aesthetics for their survivor groups, how to make breakdown read on dark materials in a darkly lit set, and the working relationship between Breakdown Artists and the on-set team.
Connect with Tamara: @tamararigbyfunke

Still from Station Eleven. Costume designed by Helen Huang. Image courtesy of Tamara Rigby-Funke.
Station Eleven is gorgeous. Can you tell us about the process of collaborating with the costume designer to create the distinct looks of the different groups?
Station Eleven was very much a passion project. I was brought on early to help with the concept, which meant building and rebuilding. Costume Designer Helen Huang was determined to find the joy, art and whimsy in the characters as they rebuild their lives in this newly changed world.
We were working under COVID lockdown restrictions and out of the Toronto International Design Centre. This location would reveal a treasure trove of recycled materials – a maker’s paradise. As a Breakdown Artist and Builder, my job is to actualize the Designer’s vision. We communicate through images and colour and often assign an emotion as per the script. Helen wanted each group of survivors to have their own look; the people in the airport are almost untouched as they had a power generator and access. The golf course folks are a little more worn with some fading as they had shelter but no power and spent time outdoors. The undersea kids were the most challenging to land on. They were young, almost feral but full of imagination and wanted to believe the story of Dr. Eleven. We see them attempting to manifest their own spacesuits out of found objects. We over-dyed the undersea kids with a brownish yellow to help with the overall look. The traveling symphony was a colourful mishmash of faded self-expression for day, and larger, more fantastical offerings for the stage.
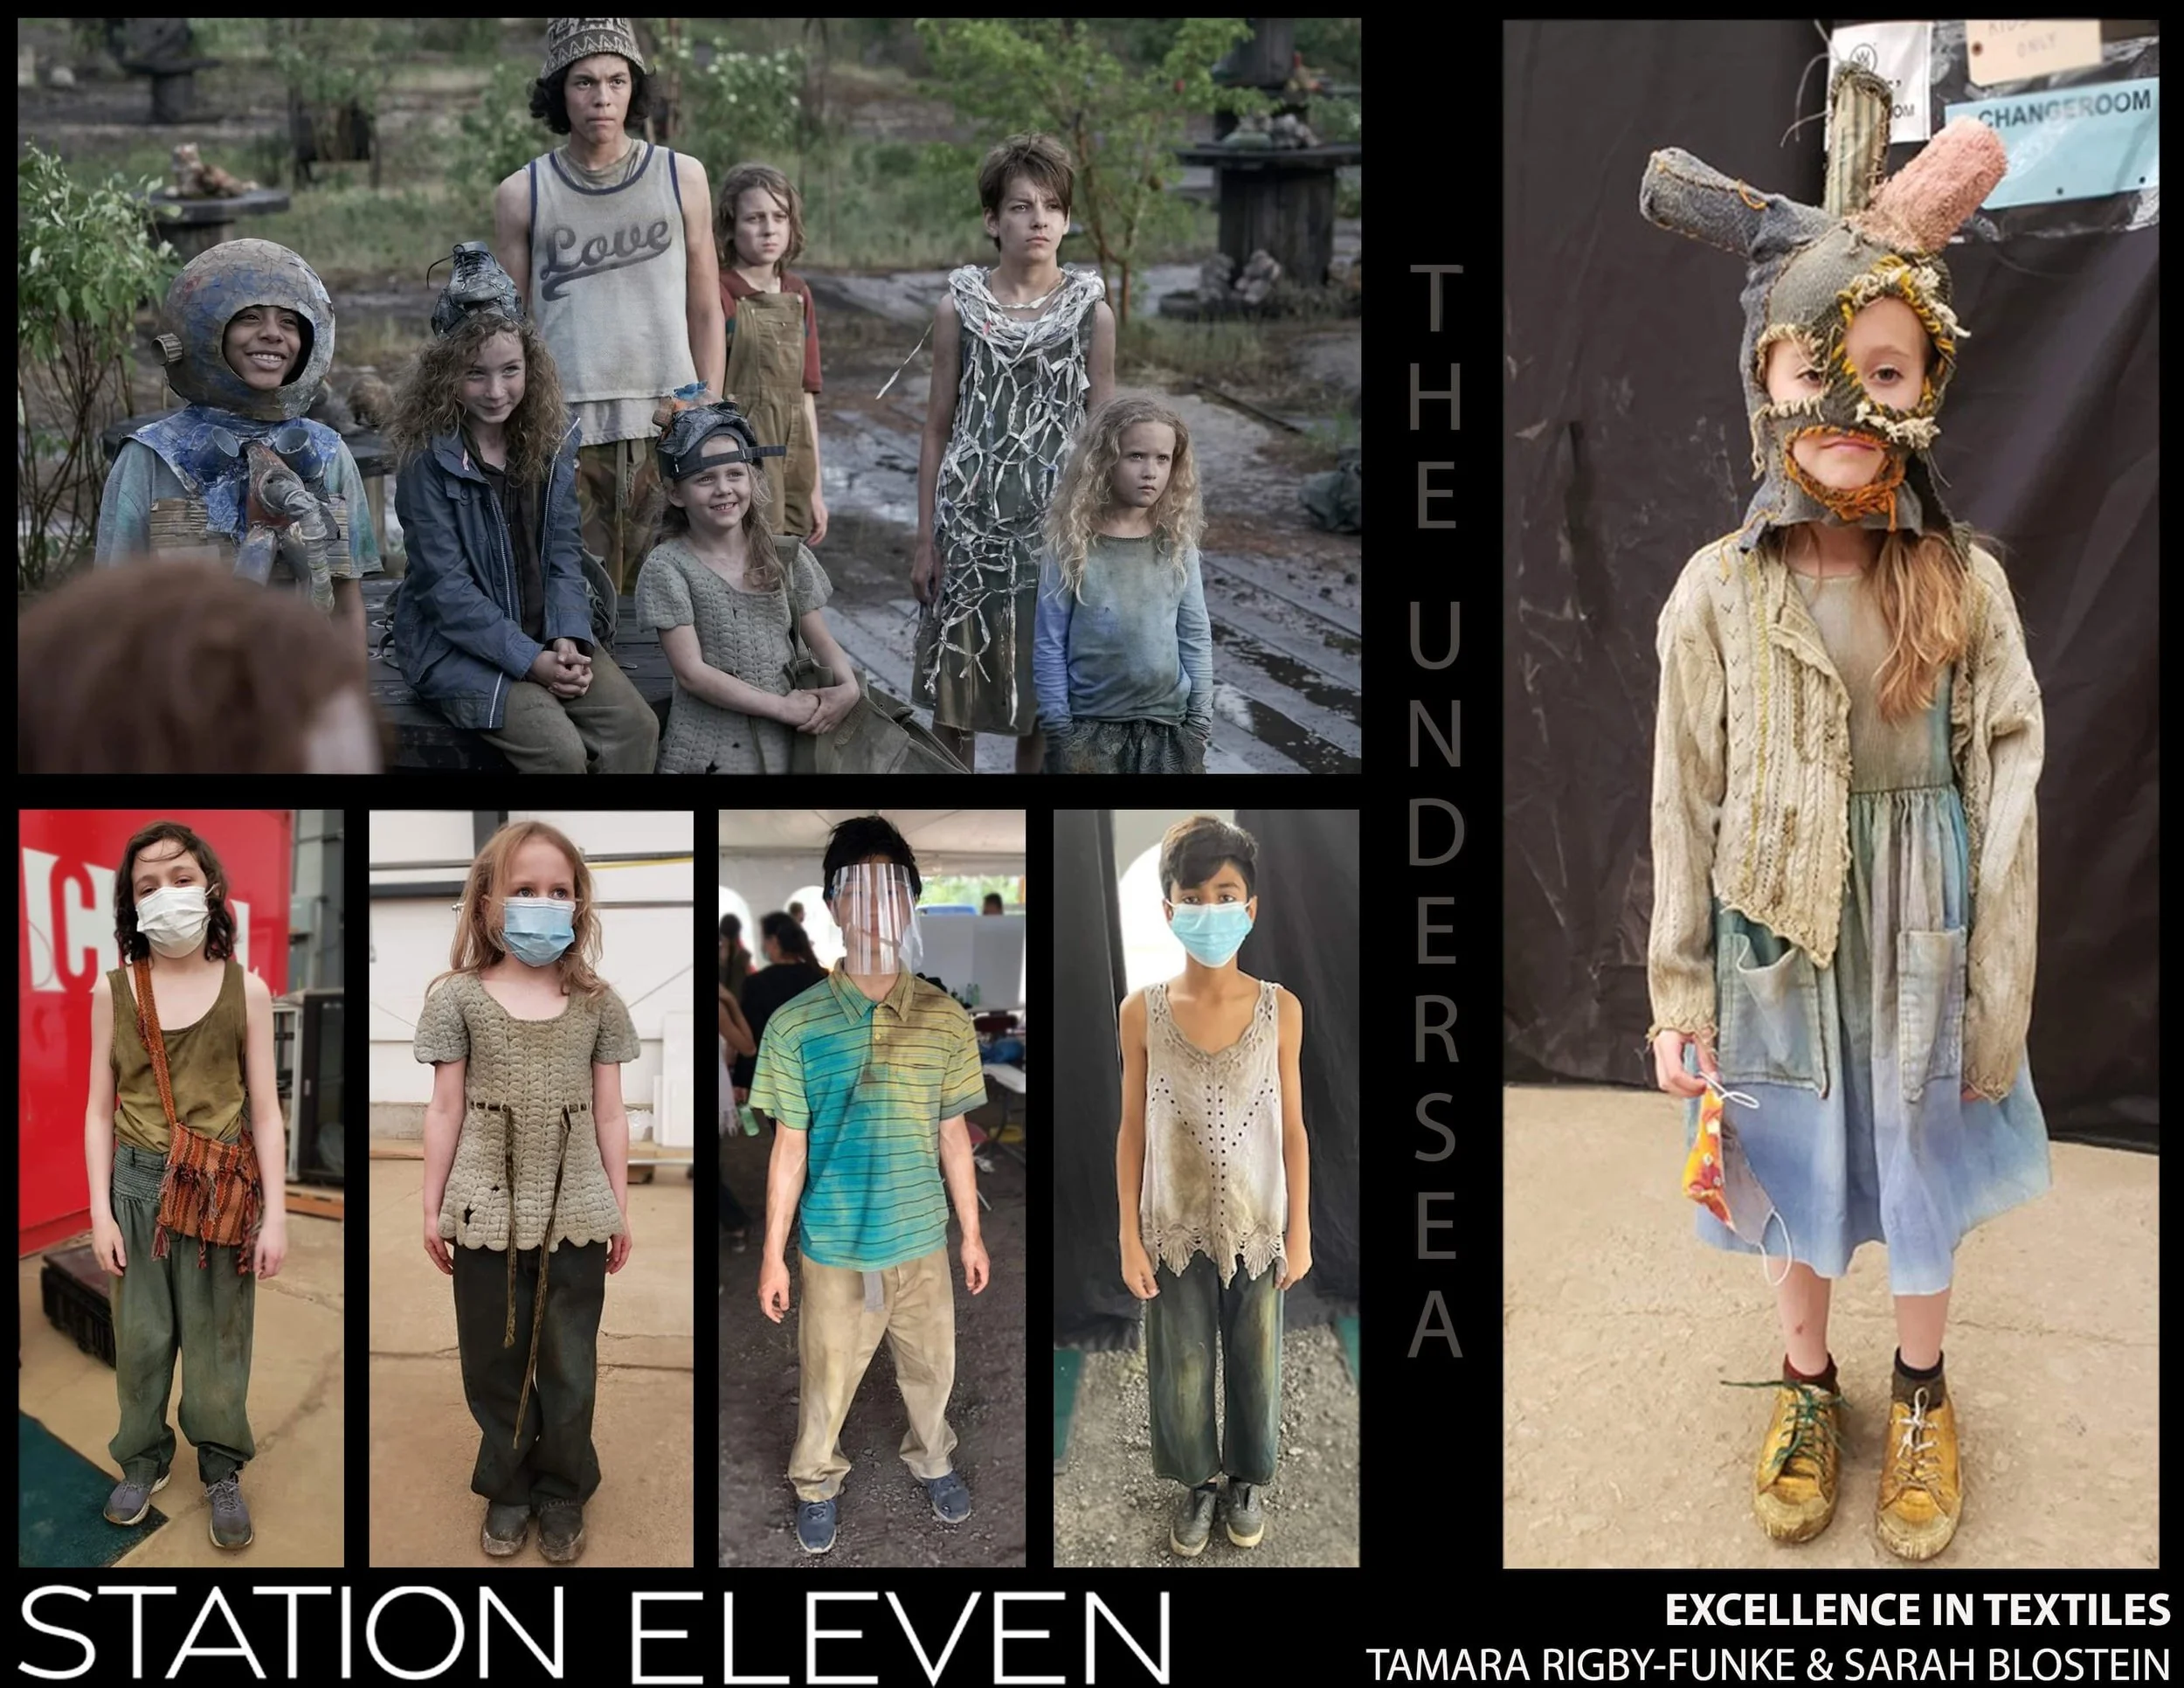
Behind-the-scenes of costumes from Station Eleven. Costume designed by Helen Huang. Image courtesy of Tamara Rigby-Funke.
As an ager/dyer on The Fire Inside, can you tell us what the differences are in this position versus being a Breakdown Artist?
The ager/dyer must be skilled in dyeing and have an understanding of textiles, how they look when aged, and be able to replicate that. It’s the same for the Breakdown Artist. For a film like The Fire Inside there’s more dyeing and making clothing look worn, yet cared for.

Close-up of costume from Scary Stories to Tell in the Dark. Costume designed by Ruth Myers. Image courtesy of Tamara Rigby-Funke.
Scary Stories to Tell in the Dark is a fantasy horror period piece. What are some of the differences in creating blood work for a project like that versus working on a project like Saving Hope, which is based in realism for the blood?
Scary Stories to tell in the Dark is set in the late 60’s with flashbacks to the early 1900’s. Costume Designer Ruth Meyers was challenging Guillermo Del Toro’s standard Victorian nightgown. Ruth insisted this garment be more restrictive as this poor girl was to be locked away and punished routinely; this girl becomes the ghost haunting the children in the 1960’s. My approach to this character was to infuse her gown with emotions and show neglect and passage of time.
In the first draft of the script, Del Toro mentions menstrual blood stains, and I tried to interpret this in the garment. Ruth was very happy, but camera only revealed the sleeve; that’s how it goes.
In comparison, the bloodiest show I ever worked on was Saving Hope. We had an SPFX team headed by Emily Skoggard that would build all the organs needed for that episode’s surgeries. We would then have real surgeons come in and perform the operations. I remember asking a brain surgeon how our skull compared to a real skull he said this is much harder! I was the set key for two seasons on Saving Hope and found the onset blood stressful. I much prefer prep.
Saving Hope sounds like it was a wild experience. You mention it was the bloodiest show you’ve worked on. After working with real surgeons and watching all those surgeries play out, did it influence any of your blood work moving forward in your breakdown artistry?
My work on Saving Hope has given me more confidence when working with blood, but I am more comfortable using paint than the onset blood.
Oftentimes, the action that happens in a horror project is at night. How do you create a breakdown or blood work that will read on camera in these darkly lit sets?
The Strain had its challenges with gore. The mongrels wore black and we would shoot at night, so what would show on black and on camera? I needed to prime some surface area so that we would be able to see colour; then we could begin to play with matte and gloss adding textures.
While working in prep, I’m always thinking about my Set Key. My job is to give them a hearty base to start from, as time is limited on set. There’s pressure and no time for redoing, so the dream is that my set key would simply need to add Ultra Wet or a drop of blood as per the Director.
I’d love to know more about the work flow between breakdown artists and the on set team.
I often prepare a kit for my Set Key, which usually includes coloured waxes they could use in a pinch. When it comes to blood, I use an acrylic paint with a textile medium and maybe a gloss medium; this is so the article remains dry for transport and actor comfort. The Set Key would have Fleet Street Blood or Mind Warp ready-made blood products to apply at finals. Depending on the comfort level of my set key, we sometimes have a tutorial.

Close-up of the Mongrel costume from The Strain. Costume designed by Delphine White. Image courtesy of Tamara Rigby-Funke.
Close-up of the Mongrel costume from The Strain. Costume designed by Delphine White. Image courtesy of Tamara Rigby-Funke.
Close-up of the Mongrel costume from The Strain. Costume designed by Delphine White. Image courtesy of Tamara Rigby-Funke.
TIPS AND TRICKS
Best tips to keep blood and dirt looking fresh on clothing throughout shooting?
For keeping blood looking bloody and fresh on set I like to use Ultra Wet. It’s water based and very wet looking and the camera loves it. You can also just add more blood but you’re changing continuity.
Best tips to keep the cast comfortable while wearing bloody clothing?
Cast comfort is difficult. Most actors understand that they will be uncomfortable and just want to get it over with. Try and make them comfortable by giving them something to lay on and keep them warm.
Best laundry tips to freshen up bloodied clothing without damaging the breakdown work?
Laundry should be cold water and hang to dry. Maybe spot clean with some Barbasol shaving cream or Windex.
How do you keep your mental health on track when working on a particularly gruesome project?
Mental health check for devastating blood work: just try and remember you’re telling a story, and check in with your inner child, who thinks you’re the coolest.
For Special FX makeup, visit Imagine Le Fun to purchase your products.
ALEX KAVANAGH
11 min read
Costume designing for six films of the legendary horror franchise, Saw, Alex Kavanagh is a key part of some of Canada’s most iconic horror moments.
Alex also has extensive experience as a Breakdown Artist. Blending her experiences in the Breakdown Department with her talents as a Costume Designer, Alex is able to work collaboratively with her Breakdown teams to create these memorable looks. Alex shares with us some of the unique challenges the Saw films presented, working closely with other departments when bringing these projects to life and what to do when things don’t go as planned on the day.
Connect with Alex: @costumealex

Behind-the-scenes from Saw II. Costume designed by Alex Kavanagh. Image courtesy of Alex Kavanagh.
You have experience working on projects where you are both the costume designer as well as the breakdown artist. Has that shaped the way you direct the breakdown artists on your team?
The only time I’ve been both Costume Designer and Breakdown Artist at the same time is on micro budget films – like The Chair or Queen of Blood – which are really fun to do.
Logistics is the biggest challenge, always. You have to be organized to be able to create the effect you want within the time you have. Having the chance to do my own breakdown is always a great reminder that people need time to do the work.
I think having a lot of experience doing breakdown myself allows for a really collaborative relationship with my Breakdown Artist. We’re able to talk about techniques, products and the overall logistics of whether or not we can achieve what we want to see.
Where do you source reference images for specific wounds? With the werewolf attacks in Ginger Snaps 2, zombies in Diary of the Dead, the Saw franchise’s knack for creating unique ways to get people bloody, how do you know what a realistic aftermath would be?
After graduating from the Dalhousie Costume Studies Program, I attended Completions School of Make Up (now CMU) for a Theatrical and Special Effects Makeup course. Learning to do prosthetics makeup introduced me to wound research and products that I hadn’t been aware of as a costumer. Something that makeup artists do is document any kind of wound that they come in contact with. I have an album of bruises on my phone, as well as a breakdown reference album. Anytime I come across something interesting, I add it to the album. It’s silly, I know, but if you’re working in horror, anything that could be a useful reference is an asset.

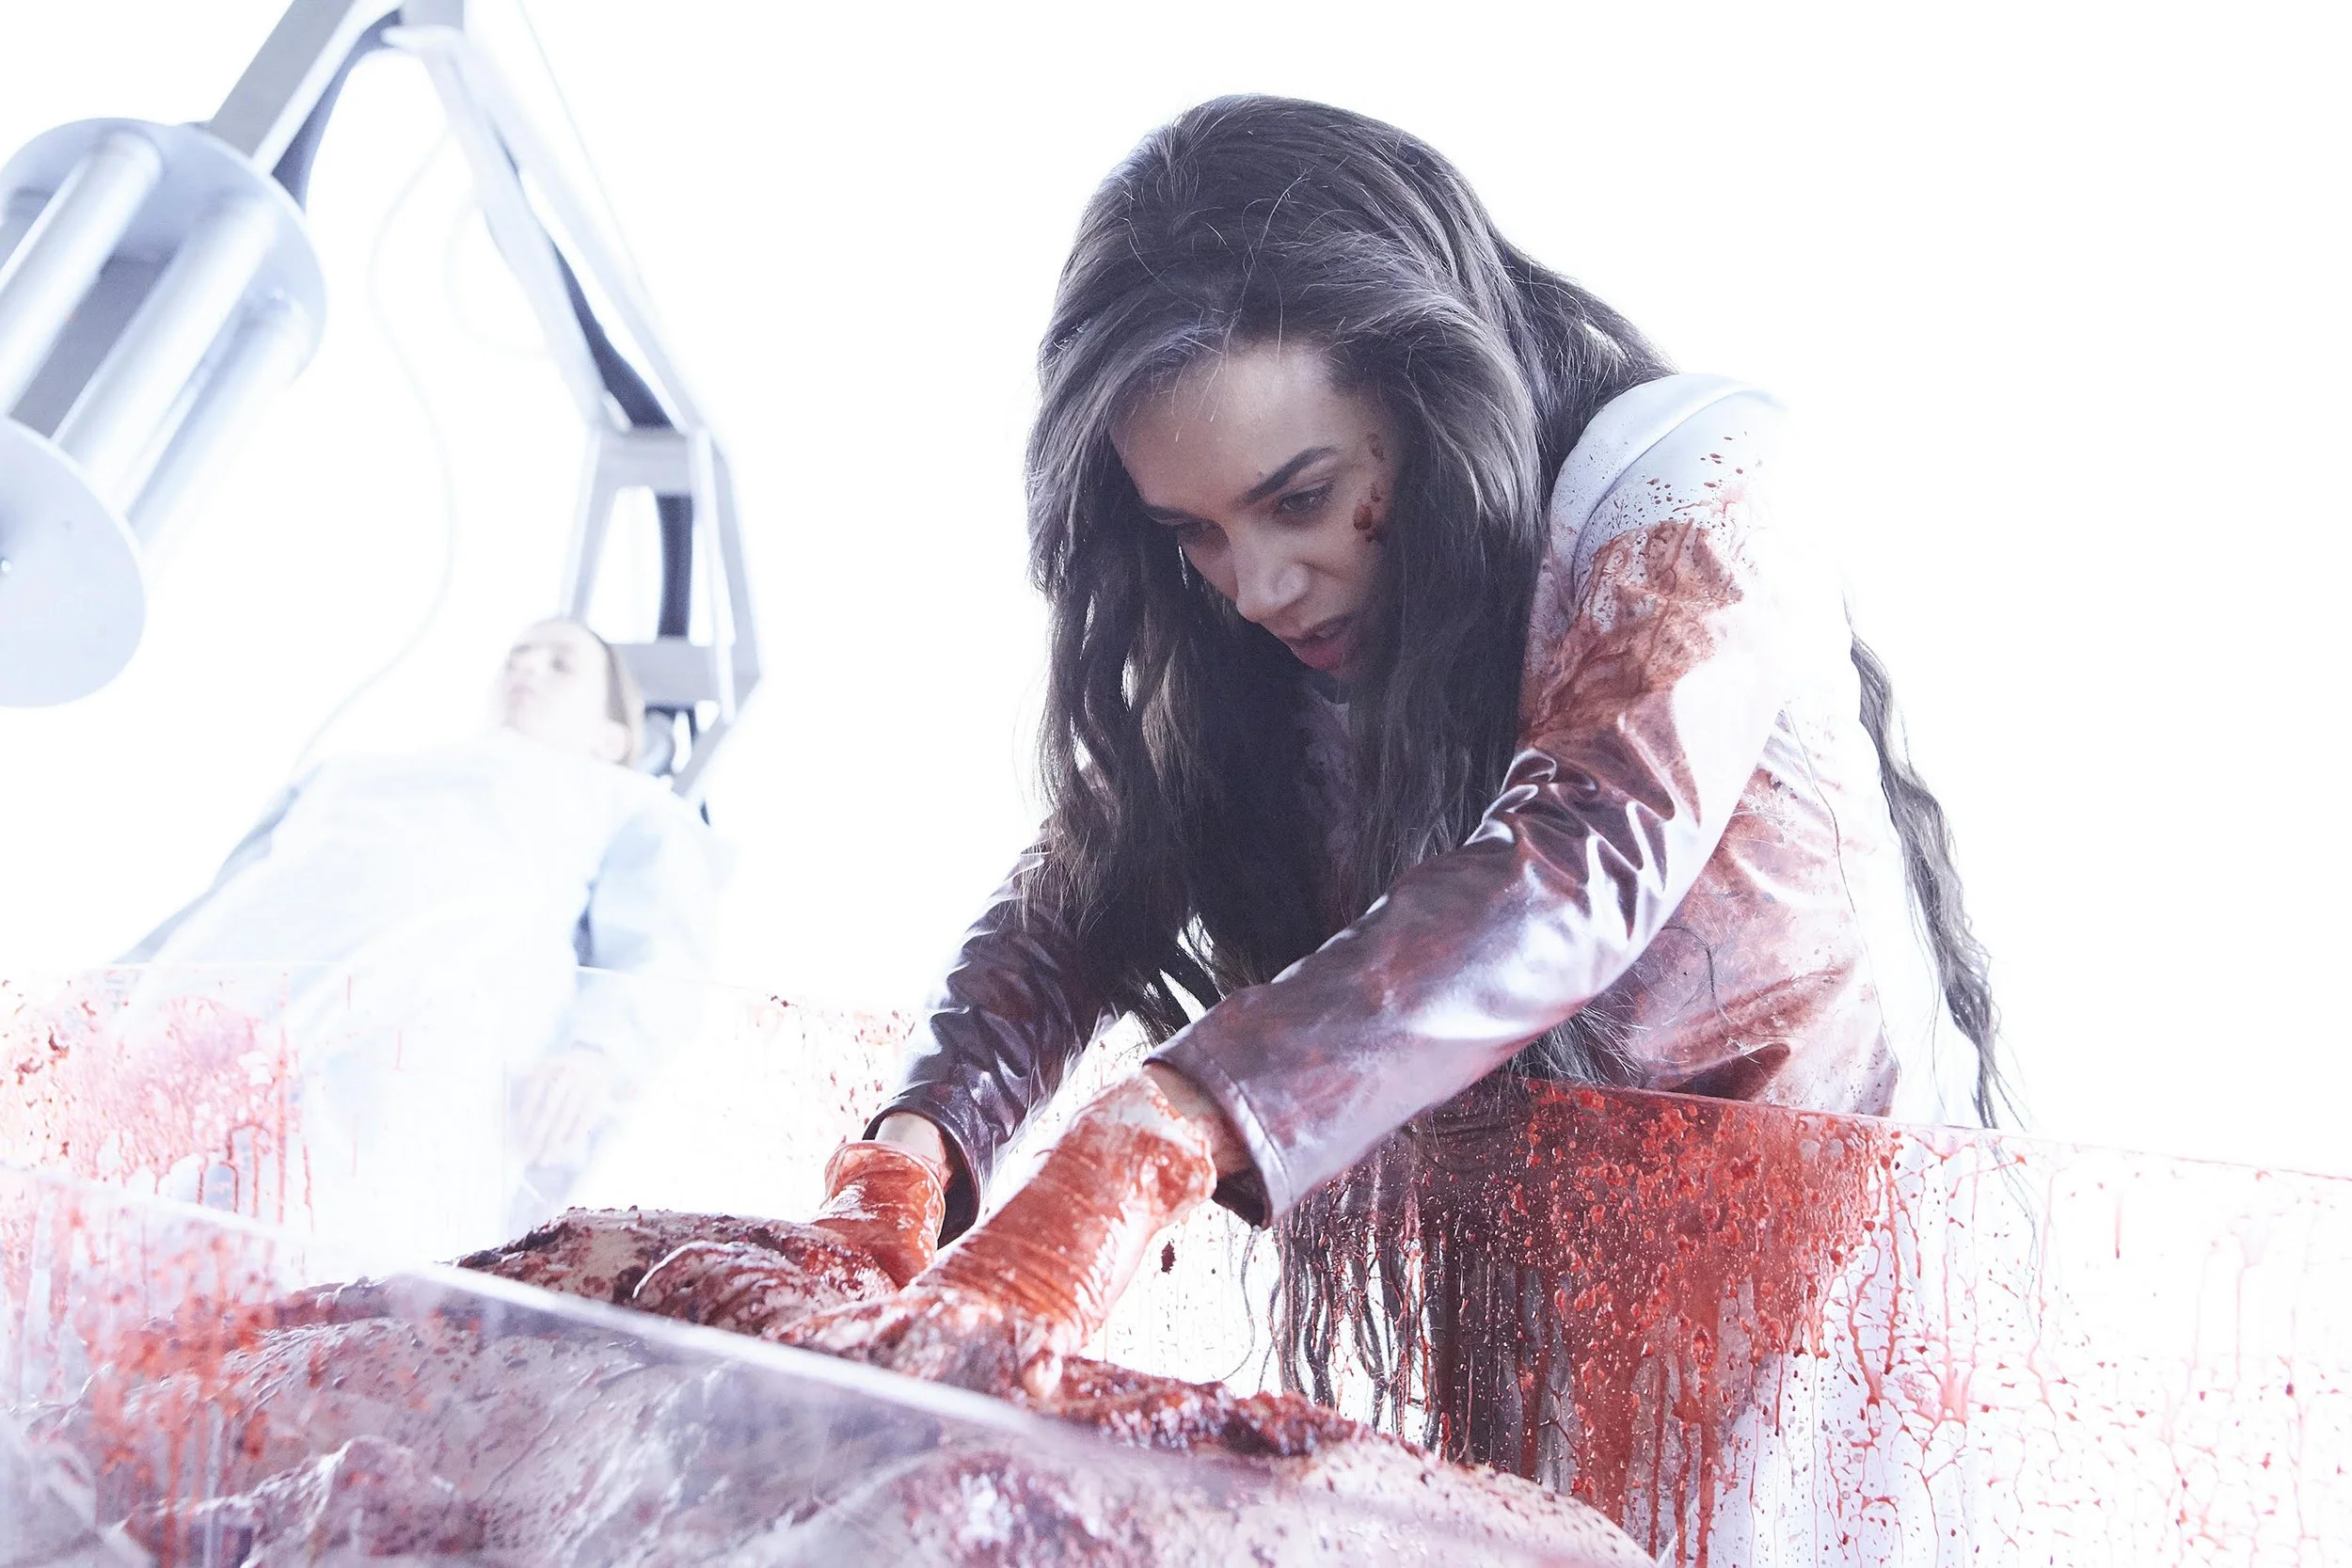
Simone from Saw II. Costume designed by Alex Kavanagh. Image courtesy of Alex Kavanagh.

Behind-the-scenes of Saw II. Costume designed by Alex Kavanagh. Image courtesy of Alex Kavanagh.
I grew up watching a lot of horror films, so I think there is a slightly nostalgic version of slasher-style bloodwork that I have in my horror films. To be honest, real casualty simulation doesn’t look great on camera; we always amp it up. Stage blood does not look like real blood. There is a theatricality to it that makes it more watchable.

Still from Saw franchise. Costume designed by Alex Kavanagh. Image courtesy of Alex Kavanagh.
Still from Saw franchise. Costume designed by Alex Kavanagh. Image courtesy of Alex Kavanagh.
The Saw franchise has spanned almost a decade. How have the processes in blood and breakdown changed along the way? Are there any new products or methods available now that have become essential to your kit?
It was interesting coming into the Saw franchise at Saw II and then doing five subsequent films, in that we tried to create perfect continuity – the entire franchise is riddled with flashbacks and overlapping storylines. We use a lot of stencils; he had a lot of multiples. It was very frustrating, actually, because they would sell off all of the costumes at the end of the film and we had to recreate the costumes every time! Documentation is essential. We kept our recipes, and we didn’t really change our techniques, other than going from paper photocopies to make our stencils to using clear plastic.
I did develop a specific blood technique on Saw II: using stage blood to establish the blood on set, then re-creating the blood splatter with acrylic blood to match the red blood, and then creating a third version; within about 15 minutes of script time we would change that blood to a darker version of the acrylic so that the next time the individual was splattered with blood, the fresh blood looked different than the previous layer.
Which tried-and-true methods have you found yourself coming back to when creating believable blood splatter and gore on costumes?
There are different ways to do blood splatter – flicking your fingers, or using a large brush for flicking – but my favourite is actually using a spray bottle! You have to get the blood-to-distilled-water ratio just right so that it will spray but not be watery, but it looks great.
Can you tell us about collaborating with other departments to create the breakdown and bloodied looks for characters? Where does the conversation start? Which departments inspire you the most when creating a look?
The overall gore for a horror film is very collaborative between costumes, prosthetic makeup and hair. From a costume’s perspective we deal most closely with the prosthetics department, such as if there are body wounds that need to be featured within the costumes – especially with zombie films!
In the Saw films, so many of the “trap” sequences are practical gags the costume, props, and prosthetics departments worked very closely on to execute. These gags were talked about in prep: we’d discuss and figure out collaboratively the needs of what had to be shown versus what had to be covered, how many takes were required, what the aftermath would look like, and more. I have to say, working on the Saw films was incredibly collaborative.


Images in order of appearance: Scene from Saw II. Costume designed by Alex Kavanagh. Image courtesy of Alex Kavanagh; Behind-the-scenes from the Saw franchise. Costume designed by Alex Kavanagh. Image courtesy of Alex Kavanagh; Still from Saw franchise. Costume designed by Alex Kavanagh. Image courtesy of Alex Kavanagh.

Multiple bloodied shirts from the Saw franchise. Costume designed by Alex Kavanagh. Image courtesy of Alex Kavanagh.
What do you do when something doesn’t go as planned? Maybe the blood pattern isn’t looking the way you want it, or there’s a change in what the breakdown needs to look like because of a script rewrite during shooting?
As much as any gag is prepped, inevitably something will go wrong. I think staying flexible, and understanding what the overall aftermath is supposed to do for the story, helps you pivot in the moment. I remember one show had a slit throat sequence; the blood ran down the actor’s chest inside the shirt and didn’t come out, so we went in and sprayed them with blood and did an aftermath shot. Sometimes gags don’t work as planned, but there is always a low-tech fix that will allow them to at least keep filming.
How do you determine how many multiples you’ll need for each breakdown piece during a shoot?
Whenever there’s a costume gag, I start with five; one clean, three for gag, and one for after. Then you have to consider: o you need more clean versions? How much action happens before the breakdown? Do you need more for after? How much action happens after the breakdown? Then, do you need more than three for the gag? Is there going to be a stunt double or a dummy, etc.
TIPS AND TRICKS
Best tips to keep blood and dirt looking fresh on clothing throughout shooting?
Because the films I’ve done have a lot of blood that plays for long periods of the script, I rarely leave the stage blood on the costume past the actual gag. I always replace it with acrylic paint (which can be washed) and I mix it with a gloss medium. I know people are also using silicone, which looks pretty great too. I just find acrylic easy to apply, easy to acquire, and it dries quickly and stays consistent.
Best tips to keep the cast comfortable while wearing bloody clothing?
I think it’s really important to consider the actor in the costume. Stage blood is very sticky and when it dries it gets very crunchy; once the stage blood has been established, I recommend re-creating the effect with a different product.
If you’re on a project that doesn’t have the opportunity to switch from stage blood to an acrylic, under dressing is the best way to keep people comfortable, i.e. flesh tone tank or camisole, etc.
Best laundry tips to freshen up bloodied clothing without damaging the breakdown work?
Trying to refresh the blood with water will only make it run. Applying a little bit of KY jelly or Ultra Wet on top of dried stage blood will help soften it without letting it run and turn pink
How do you keep your mental health on track when working on a particularly gruesome project, day in and day out?
I will say working on horror can be pretty funny to work on, but the screaming will eventually get to you. Always try to remember you’re telling a story. Horror films are often social commentary, and keeping the overall message in mind helps the day-to-day.